While still quite unconventional, aerobars are gaining in popularity for bike trips thanks to the rise of ultra racing events like the Tour Divide. But what you may not realise is that for these events, and many other bike trips – bikepacking aerobars aren’t really about speed. Most aerobar users will agree the biggest advantage is actually the extra comfort they offer.
Let’s get aero!
![]()
Rob English makes custom bikepacking aerobars for his customers, this one is built around a Jones Loop bar.
Why Bikepacking Aerobars Are Awesome
Enjoy A Different Riding Position
Aerobars offer an entirely new riding position that’s most beneficial on long days where your body sits statically. With your elbows and humerus (arm bone) supporting the majority of your upper body weight, you’ll reduce strain on your arms, wrists and hands. In addition, aerobars will allow you to stretch out and use different back muscles.
Reduce Your Frontal Area
One of the biggest forces working against you is wind resistance. Aerobars will help to reduce your frontal area, resulting in higher riding speeds for the same amount of effort. This is particularly nice if you’re riding into headwinds but will also appeal to those attempting to cover longer daily distances.
More Mounting Options
If you’ve ever used then removed a set of aerobars after an event, you’ll know how much you miss that extra bar real estate. For bikepacking setups, aerobars are a great place to mount bike computers, lights, phones and feed bags. Check out the Profile Design UCM ($11 on Amazon) to create more horizontal space.
![]() Lewis Ciddor making the most of his bikepacking aerobars in New Mexico to take the 2018 Tour Divide win. Image: Tom Briggs
Lewis Ciddor making the most of his bikepacking aerobars in New Mexico to take the 2018 Tour Divide win. Image: Tom Briggs
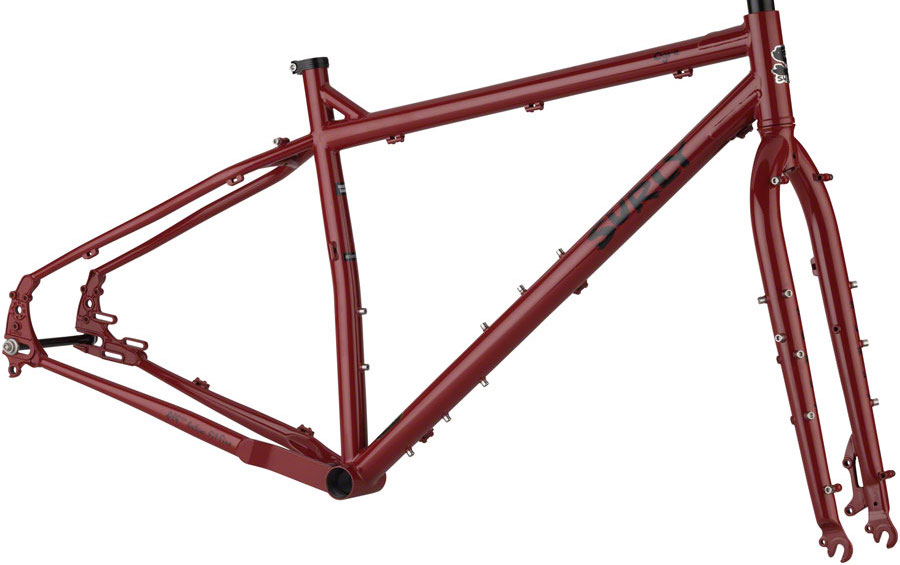
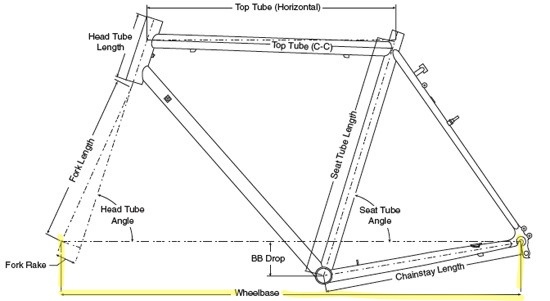
Frame Design And Aerobars
There are two frame geometries for bike travel:
– Frames that are designed for flat handlebars (with longer top tubes)
– Frames that are designed for drop handlebars (with shorter top tubes)
Given that riding in an aero position requires you to stretch further forward than normal, drop bar bikes with their shorter top tubes tend to be the best candidates for an aerobar setup. That said, there are a few products that will help you to achieve a comfortable riding position on flat bar bikes too, which I will be focusing on below.
Super Adjustable Aerobars
![]()
The majority of aerobars are designed to increase your speed on a road racing bike, more specifically in the triathlon discipline. The thing is that sizing between almost all road bikes of similar sizes is within millimetres, so aerobars don’t actually have to be very adjustable for the most part.
However, given that there is so much more variation between touring and bikepacking frames, plus the fact we’re looking to prioritise comfort over speed – you’ll want some aerobars with the most adjustability possible.
Here are the adjustments that are most useful for bike travel:
Armrest Adjustment. The vast majority of aerobar armrests are limited to a fixed position only (or a few millimetres of adjustment). In order to optimise your bike for comfort, however, you will probably need to bring your aerobars closer to your saddle using armrest adjustment. The only downside to this aerobar design is that they aren’t compatible with flip-up armrests (I’ll talk more about flip-up armrests below).
Arm Pad Adjustment. Most arm pads can be rotated inward up to about 15-degrees, allowing you to dial in your position. Arm pads are often available in multiple thicknesses too. Profile Design offer 16mm and 20mm, the latter is preferred for dirt road riding.
Extension Adjustment. The two bars that stick out from the front of aerobars are the ‘extensions’ or ‘skis’. These are normally adjustable in terms of length, rotation and width.
Height Adjustment. Some aerobar models have compatible riser kits that allow 50-70mm / 2-3″ of height adjustment. Getting the appropriate height will not only allow you to maintain a good hip angle but will also decrease the overall reach, resulting in a more comfortable riding position (I’ll talk more about aerobar height below).
Fred Bar Steerer Mounting Kit
![]()
A steerer mounting kit like the Fred Bar puts your aerobars directly above your stem, reducing your aerobar-to-saddle distance by approx. 40-80mm / 2-3″. This 133-gram steerer mounting kit was originally designed for flat handlebar bikes but is also a great option if you’re using aerobars without adjustable armrests (see picture above). A side benefit to the Fred Bar is that you can quickly add or remove your aerobars from your bike by simply removing your stem top cap.
Recommended Aerobar Setup Height
![]()
On a touring or bikepacking bike, you’ll probably want to fit your aerobars a few centimetres higher than your saddle. The reason for this isn’t to optimise comfort, but rather to ensure your hip angle doesn’t change when switching between your aerobar and regular riding positions.
A radically different hip angle requires a different saddle position in relation to your crankset. That’s why you’ll find such steep seat tube angles on time trial bikes. With a lower and more forward riding position, you’ll also need a different saddle shape that’s wider and more padded on the nose.
For bike travel, you’ll be best off setting up your aerobars high to start with. You can then reduce the height until you’re low enough to be fast, but also comfortable enough to maintain your riding position for long periods of time. If you find yourself sliding forward to the nose of the saddle, you’ll either need to move your saddle further forward, or increase the height of your aerobars. For moderately low riding positions (ie. aerobars a touch lower than your saddle), sliding your saddle forward on the rails will be enough to accommodate for the small changes to your hip angle.
You can raise your handlebars on your steerer if you have space, but the preferred option is to use aerobar riser kits. This will allow you to keep your existing handlebar height but also optimise your aerobars independently of everything else. If you prefer a slightly lower handlebar position but don’t want your aerobars to affect your hip rotation, an aerobar riser kit with up to 70mm / 3″ rise will be 100% necessary.
Do you still want a riding position that’s aerodynamically optimised? You should look into:
Dual-Position Seatposts
A really neat workaround for the hip-angle thing is to install a Redshift Switch seatpost. In just a second you can move your seat 50mm / 2.0″ forward, providing 3-4 degrees of effective seat tube angle change. Then when you’re done using your aerobars, you can shift your seat back to a more suitable position for riding upright.
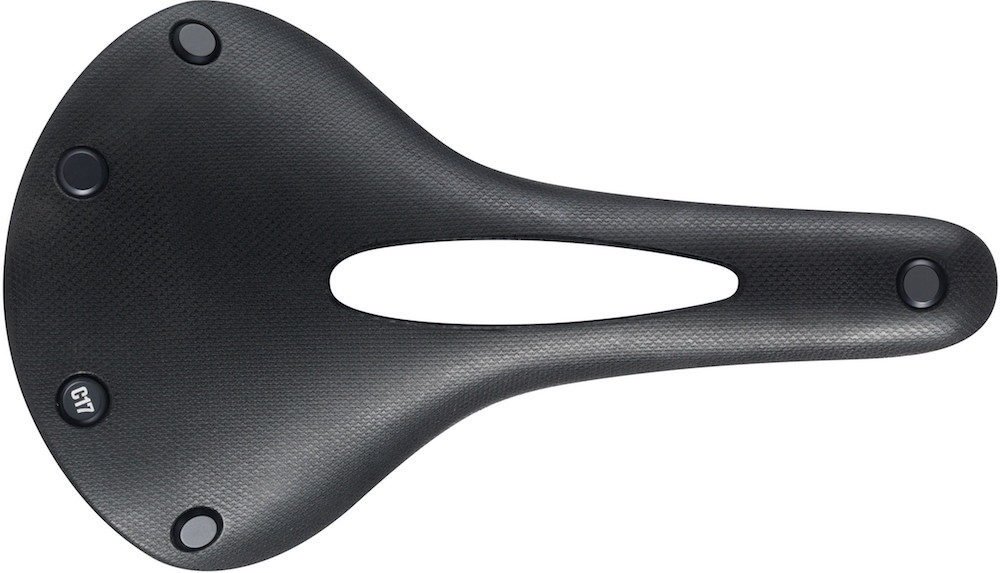
Time Trial Saddles
Lower and more stretched-out riding positions put much more weight on the nose of your saddle. To be comfortable, you’ll need to test out a few time trial or triathlon saddles. If your position isn’t too low, a great all-around saddle for both a time trial and road position is the Selle SMP Pro.
Aerobar Types
![bikepacking aerobars]()
Shape and Construction Material
Aerobars often come with two individual extensions (skis), but they can also be connected at the front. You’ll probably prefer individual extensions because that will allow you to adjust the width between armrests too. The extensions themselves are available in many different shapes to suit different wrist angles; the more angled versions tend to feel the most natural (but are slightly less aero). Aerobar extensions are constructed out of aluminium, carbon or titanium, but other than the 40-50 gram weight saving, you’ll find very little difference between them.
![]()
Fold-Up Armrests
There are two reasons to use fold-up armrests. The first is to gain more handlebar real estate on a narrow drop handlebar. By getting the armrests out of the way, you’re able to make use of, rather than lose the top of the handlebars. Fold-up armrests also offer a much better fit for bikepacking stem/feed bags (more on that below). The downside to fold-up armrests? They’re only available for aerobars with fixed position armrests (no forward or backward movement). I recommend fitting fold-up armrests only once you’ve worked out what position works for you first – they’re normally only available as an upgrade anyway.
![]()
Mini Aerobars
These small and lightweight aerobars (~200 grams) are designed for particularly short riding durations (eg. sprint distance triathlons). Most people who have used mini aerobars for bike adventures have found that the short extensions simply put too much force into their wrists, rending them useless after only a few minutes. That said, it’s possible mini aerobars could work for you if you put very little upper body weight on them; you’d have to have a particularly short and upright riding position for this to be the case, however.
![baryak]()
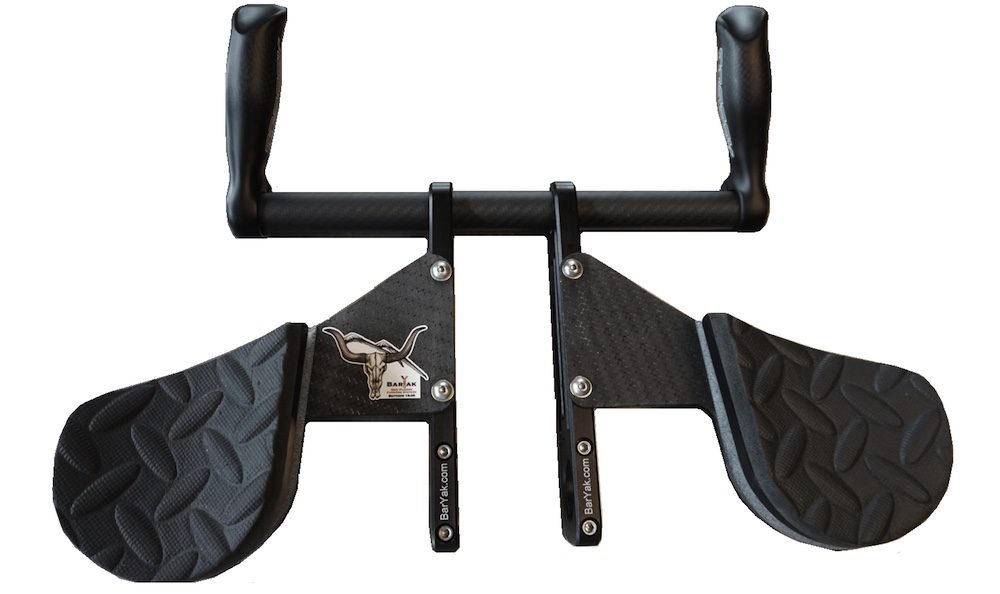
BarYak Expedition
BarYak aerobars have been designed specifically for bikepacking with flat handlebars in particular. Unlike other aerobars, the wide elbow pad width allows for feed bags to be used on either side of your stem. While these aerobars aren’t quite as short as a mini aerobar, you will still have to compromise a bit on length. Other advantages to using the BarYak system include being able to mount a Revelate Sweetroll handlebar pack at four locations (rather than two), extra space for accessories and the fact you can angle the bar-ends to your preferred wrist angle.
![]()
Jones Gnarwhal
A little-known product that gives an aerobar-like position is the Jones Gnarwhal. This single bar-end is fitted out the front of a Loop bar like a rhino horn (or narwhal tusk!). The Gnarwhal gets quite mixed reviews; a few users have found that simply running their arms along the ends of the Loop bar achieves a very similar body position. If you do decide to give the Gnarwhal a try, make sure to install some thick foam under your bartape to ensure maximum elbow comfort.
Bikepacking Bags and Aerobars
![bikepacking aerobars]()
Jonas Deichmann fitted his stem bags out to the side for his 97-day ride from Alaska to Argentina.
Feed Bags (aka Stem Bags)
Aerobars typically share the same handlebar real-estate as stem bags. That doesn’t stop people mounting their stem bags wide, or directly from the aerobar extensions out front.
![bikepacking aerobars]()
Ultra racing legend Kristof Allegaert using the Apidura aerobar pack on a Curve Belgie road bike.
Bikepacking Bags Designed For Aerobars
Bikepacking handlebar packs have no problem mounting to a bike fitted with aerobars. There is one handlebar pack designed to fit directly to aerobars though: the Apidura Racing Handlebar Pack. This bag mounts at four locations, keeping it stable and reducing the strain on your brake and gear cables. It also has integrated feed bags on either side to quickly stow additional bidons or snacks.
![mark beaumont bike]()
Mark Beaumont rode 18-hours per day around the world record (78-days) with this aerobar cockpit. See his KOGA bike HERE.
Handlebar Bags
It’s almost impossible to use aerobars in conjunction with a typical touring handlebar bag. The only way I’ve seen this work is if the handlebar bag is mounted very low on a t-bar, but this will depend entirely on your bike setup. For the vast majority of bikes, I’d suggest handlebar bags are incompatible with aerobars.
Recommended Touring & Bikepacking Aerobars
*If you want to buy any of these aerobars, doing it via the Amazon links gives CyclingAbout a small commission (no cost to you) which goes into creating more great resources for the bike travel community.
![]()
Profile Design T+ Series – 500 grams – T1+ (US $119), T2+ (US $92), T3+ (US $169), T4+ (US $106)
Thanks to their huge adjustability, the entire T+ series are popular for bikepacking. Some riders can even get the adjustable armrests back far enough to be comfortable on flat bar bikes without requiring a Fred Bar. This series of aerobars comes in five different extension bends (T4+ highly recommended) and two different pad kits (16mm or 20mm for extra comfort). Extension adjustments include the length, width and rotation; the arm pad angle can be adjusted 15-degrees too.
Riser kits for the T+ series are available up to 70mm. If you’re happy to lose the armrest adjustment, the flip-up bracket kit (US $88 on Amazon) adds more handlebar usability and only 20 grams.
![]()
Pro Missile S-Bend – 484 grams – US $179
The closest aerobars to the T+ series are the Pro Missile. While they have great adjustability, there’s only two extension shapes available and no riser kits that I know of. They may be easier to get your hands on, however, as they are available through all Shimano dealers.
![bikepacking aerobars]()
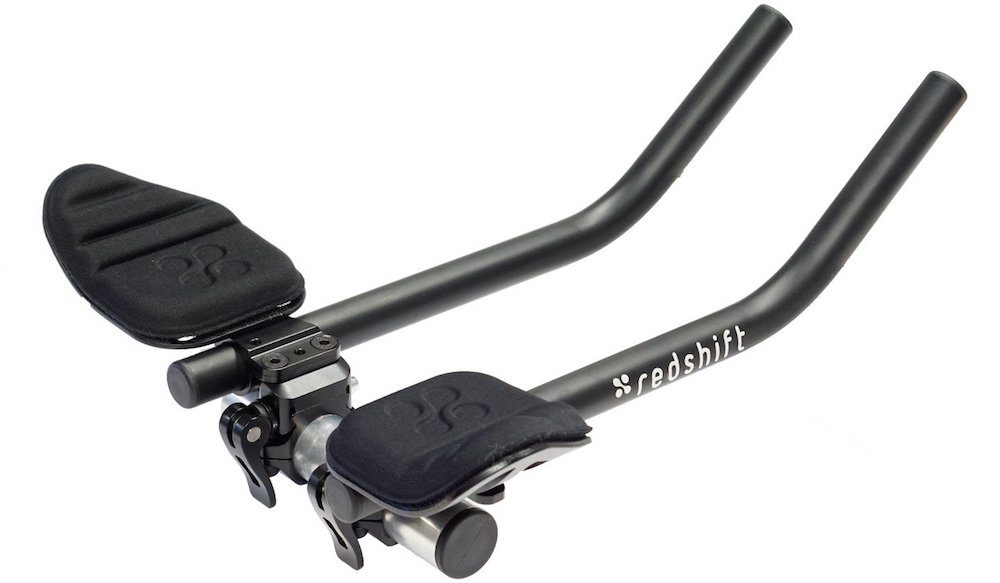
RedShift Switch Aero System – Carbon 564g and US $249 – Aluminium 640g and US $179
If you’re planning on fitting and removing your aerobars regularly, you’ll want a set of RedShift Switch aerobars. These quick release bars take just a few seconds to install/remove and you can even have clamps on multiple bikes! There are two extension shapes available – L-bend (recommended) and a flatter and more aerodynamic S-bend. The only limitations of the Switch bars are the extra weight and lack of armrest adjustment. That said, these bars could be a great fit on many bikes in combination with a Fred Bar steerer mount.
![]()
BarYak Expedition – 484 grams – US $365
I talked about the BarYak above – with these fitted you’ll get feed bag space, accessory space and more mounting points for a Revelate Handlebar Harness. The main downside is the lack of length and adjustability of the armrests, so this could be a great upgrade once you’ve already found a position that works on your more adjustable aerobars.
Aerobars For Bike Travel. Yes Or No? Tell Us Your Experience Below.
The post Bikepacking Aerobars: Increase Your Comfort And Speed On Your Bike Adventures appeared first on CyclingAbout.com.


 I’ve been getting caught up in storms every afternoon! This is a sure sign of the changing seasons from the dry winter to the wet summer. Luckily, it’s still much drier than not.


 With the diverse landscapes, wild views, amazing camping and lack of cars, I’m convinced this is the best touring route in the world. I pushed my bike for just 500 metres in total, so it’s also very rideable.


 )
)


 I’ll just be carvin’ it up here, come join anytime.

 Today I’m cycling towards the Amazon to a region where there aren’t even roads marked on the maps. Hopefully, I’ve done enough homework to string together 7-8 days of small mountain tracks. It’ll be two weeks of backtracking and re-routing if not… wish me luck!


 The rear rack needs replacing too; it was the roll cage that protected the rear end of the bike. A massive shout out to Aloys at KOGA for helping to get this broken traveller back onto the smallest trails of the Andes!

 ).
).