Quantcast
Channel: CYCLINGABOUT.com
Viewing all 455 articles
Browse latest View live

Guide: Mountain Biking Bali – MTB Rides, Cycling Destinations, Bike Tours, Accommodation

$
0
0

Bali is known for its relaxed vibe – sitting on the beach in the sun, surfing offshore and hiding in the rice terraces. Tourists generally flock to Kuta, Seminyak, Ubud and Uluwatu, given their proximity to the airport and endless hotel choices.

Bali is also a very deserving place for a biking holiday. I was blown away with how easy it is to escape other tourists, and get my explore on. The landscapes are wonderfully diverse, the nature of the Balinese people is inspiring and the cycling is fun and interesting. The highest point on Bali is Mt Agung (3031m), but the majority of the central region is well over 1000m, keeping the air cooler than the lowland areas.

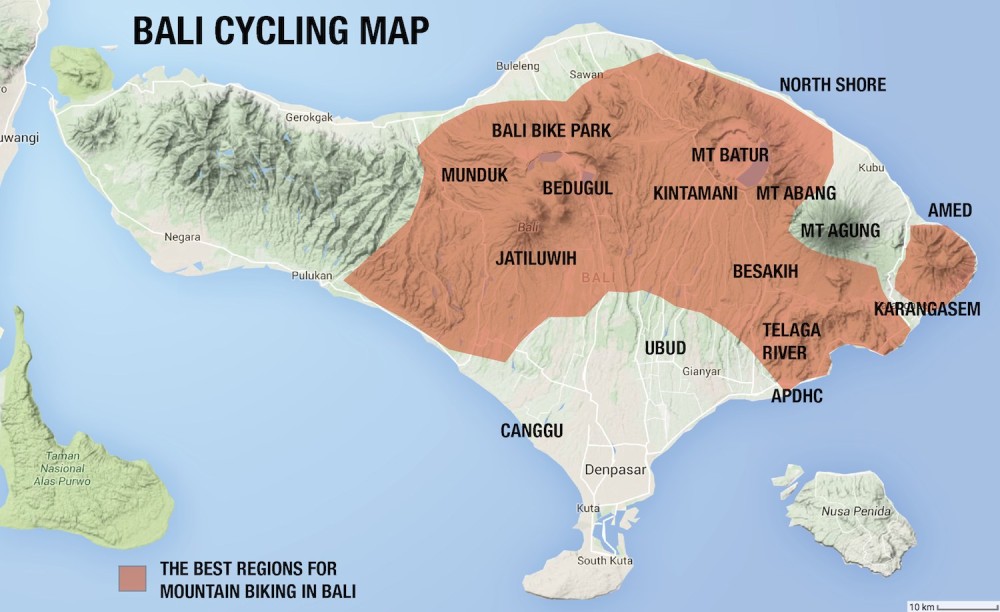
The majority of the cycling hotspots are in the central and eastern regions of the island. You’ll find all kinds of environment here; rainforests, lava rocks, pine trees, bamboo trees, rocky outcrops, coloured sands and the driest, most arid land. It’s possible to connect the small mountain roads to complete a multi-day loop, or alternatively get a lift up into the hills for one-day rides.

Let’s take a look at the best of what Bali has to offer!

Bali Mountain Biking Map

Mountain Biking Highlights

Bali Bike Park
Fancy yourself pretty handy on the mountain bike? You should definitely check out the Bali Bike Park for a day. There are between 5-10 trails of varying difficulty on this property 1300m up in the mountains. You will be shuttled up the hill all day until you can no longer ride. HERE is a video I shot at Bali Bike Park on cross country bikes, but the best bikes for the job are definitely 5-6 inch trail bikes.

BaliByBike 036

Mountain Roads around Lake Tamblingan
My favourite road in Bali is located right up in the mountains near Munduk. The road is like a roller coaster, taking the steepest, fastest lines up and down the volcanic hills – wide enough to fit just one car. The surface is smooth as glass, the freshly-laid bitumen offers ample grip around the banked corners. The icing on the cake is a recently painted white line dividing you with the scooters heading the other way, forcing you to keep left and take the corners tight. This is an A+ bike path in the mountains – it’s perfect!

BaliByBike 087

Rice Paddy Fields around Jatiluwih
Rather than provide you with a route, have your own explore of the rice paddy roads around Jatiluwih. There’s so many singletrack roads connecting all of the rice fields. These rice terraces are world famous, in fact, since 2012 this land has been protected by UNESCO. It isn’t just the beauty of the landscape that makes the rice terraces culturally significant, but rather the water management system of canals and weirs, known as subak, which has been in operation for 1200 years. THIS video shows us having a play on our bikes one rainy afternoon. If you’re not keen to go adventuring, Bali Bike Park and Infinity run tours here.

BaliByBike 047

Crater Rim Trail and Ocean View Enduro
These two trails start at the same place at 1700m elevation, and wind their way down to sea level. The Crater Rim Trail follows the outer rim of Mt Batur to offer spectacular views both left and right. The Ocean View Enduro uses a higher ridgeline which you peel off to descend 1400m through all kinds of forests, villages and farms. These trails are best tackled with a guide on a 5-inch plus dual suspension mountain bike hired from Bali Bike Park. Infinity or Bali Trailblazers also run slightly different routes towards Mt Batur. HERE is my video of the Ocean View Enduro.

BaliByBike 015

Karangasem to Amed
This is the best section of coastal road in Bali, in fact every other coastal road pales in comparison. It’s certainly not a flat section of road; you will be busting your gut to climb some of the sections of road. But you will be rewarded with twisty roads, ocean views and lots of small villages. There’s lots of great accommodation closer to Amed. You’ll find a section of THIS video riding along the Amed coast.

BaliByBike 158

The windy coastal road near Amed is simply stunning.

Black Volcanic Rock Circuit on Mt Batur
An out-of-this-world experience, this lava rock circuit will require a mountain bike to negotiate the terrain. Piles of black volcanic rubble formed a unique landscape that I’ve simply never encountered before. There is very little green amongst the black, giving the impression that your are riding your bike on another planet. HERE is a video of us having fun in the volcano. Bali-Rides, Infinity Mountain Bike and Bali Bike Park can guide you through this region.

Cycling on the volcanic rocks of Mt Batur.

Cycling on the volcanic rocks of Mt Batur.

Other Rides

Descents from Kintamani Towards the Shore
These road descents are great fun! There’s probably more than 10 different options which will take you to within 20km either side of Ubud. Just pick a road (the smaller the better) and have a great adventure. Try to bring a smartphone with offline maps to make sure you don’t get lost. Or maybe just get a guide from any of the tour operators – almost all conduct rides in this region.

A Lap of the Island
The romance and intrigue of completing the 350km lap of Bali pushed me to get out and do it, but the reality is that the ride is average at best. For the most part, the coastal road has lots of cars and trucks and the most beautiful parts of Bali are up in the mountains. Nonetheless, I made a VIDEO of my time completing the lap.

BaliByBike 163

Pidpid Village to the South Shore
This 40km downhill ride drops 750m in elevation from the slopes of Mt Agung to the white beaches of the southern shore. You can descend this trail with Bali Trail Blazers or Bali-Rides.

Mt Batur Summit Hike and Ride
Gravity-focussed adrenaline junkies will love the challenge of hauling their bike to the summit of Mt Batur for sunrise, then pinning it down the steep volcanic trails once all the hikers are gone. Bali Bike Park and Infinity will guide you for this pretty awesome morning.

Bali Mt Batur Summit Ride

Image: BaliBikePark.com

Mount Abang to the Telaga River
This trail starts east of Kintamani near Mount Abang, and winds its way along the slopes of Mount Agung before finishing on the Telaga River around 10km from the shore. You’ll ride small trails through volcanic rock fields, forests and rice terraces, all with less than 400m of climbing! You can do this ride with Bali-Rides.

Besakih to White Sand Beach
This ride requires a high level of fitness given the 1000m of climbing (don’t worry, there’s 2000m of down). You’ll do singletrack through farm land, bamboo forest, rice terraces and quarries. You can experience this cross country trail with Bali-Rides.

Mt Batur Black Sand Ride
Riding on the unique black sand is incredible. Everything around you is at such a contrast to the deadening black of the landscape. You should be a competent gravity rider to have maximum fun. Have a chat to Bali Bike Park if you want to do some runs!

Bali Black Sand Ride

Image: BaliBikePark.com

Mt Abang to the North Shore
This ride takes you from east of Kintamani around Mt Abang and down towards the shore. The trail is unique in that it makes the most of the dry, arid environment found on the north of the island. You can ride around Mt Abang with Bali-Rides or Infinity.

Asia Pacific Downhill Challenge Track (APDHC)
This trail has been built for DH racing, and is only recommended for highly skilled riders. Get in contact with Bali Bike Park for shuttles.

Bali APDHC Track

Image: BaliBikePark.com

Where to Stay?

Accommodation is plentiful across Bali, and unless you’re after something very specific – you’ll find it without a booking, wherever you go. Prices can be as cheap as US $10 per night for a room, but will be more expensive in popular areas. I always recommend having a place booked in advance for when you first arrive in Bali.

I stayed at the Chillhouse Bike Retreat in Canggu and completed almost all my riding from there. Rooms for two start at US $125 per night, including all-you-can-eat breakfast and dinner. This place is a little haven, with spacious rooms, places to lounge and swim, and delightful organic food – all surrounded in lush greenery. There’s a reason why you’ll find so many 5-star reviews on TripAdvisor!

In the smaller towns, you can find places with ‘hotel’ or ‘guesthouse’ signposted the front. Most accommodation actually has signage with arrows from the main street of each town.

Susanna from The Chillhouse helped me regularly with tours, food and general advice.

Susanna from The Chillhouse helped me regularly with tours, food and general advice.

MTB Tour Operators

Bali Adventure Tours // info@baliadventuretours.com
Bali Baik Bike // bikebaik@yahoo.com
Bali Bike Park // ride@balibikepark.com
Bali Eco Tours // baliecocycling@gmail.com
Bali Rides // info@bali-rides.com
Bali TrailBlazers // isabelle.balitrailblazers@gmail.com
Banyan Tree Bike Tours // banyantreecyclingtours@gmail.com
Infinity Mountain Biking // info@infinitymountainbiking.com
Mountain Bike Bali // info@mountainbikebali.com

Are you a Bali tour operator? Get in contact to have your details added.

FAQs

When is the best time to go?
Anytime! Bali is located in a tropical region, so the temperature daily min/max constantly ranges between 23-32 degrees celsius (75-85 degrees fahrenheit). The rainfall is highest between December and March, and is lowest in June through August. The mountain biking advantage of coming in the wet season is grippy trails with little dust.

How do I get there?
If you’re coming from another country you will fly into Denpasar Airport, located near the southern-most point of the island. Direct flights are available from Australia, China, Thailand, Malaysia, Singapore, Korea, Japan, UAE and more. You can cross by ferry from Indonesian islands Java and Lombok.

What should I bring?
Accommodation is relatively frequent, as are places to eat and shops for snacks. If you’re not bringing your bike, you can hire decent mountain bikes from any of the commercial tour operators. If you’re a keen cyclist, you might want to bring your own SPD pedals and shoes, shorts, jersey, helmet and gloves. Otherwise, all you really need is clothes and toiletries.

What gear ratios do I need for the climbs?
Low gearing is essential for Bali. If you’re on a road bike, you’ll ideally have a compact crankset (50-34) and wide range cassette (11-32) at a minimum. Stock mountain bike gearing is generally adequate. If you’re on a touring bike carrying a lot of gear, you should have a low gear of 20 gear inches or under (24-34t).

What is the road surface like?
The main roads are well paved. The secondary roads can be rough at times. The wider your tyres, the more off-road you can go!

Don’t Forget to Check Out My Bali Photo Essay for Cycling Stories from Bali!

The post Guide: Mountain Biking Bali – MTB Rides, Cycling Destinations, Bike Tours, Accommodation appeared first on CyclingAbout.


Vagabond Bicycle Bags Go Modular By Making BikePacking Bags That Turn Into A Hiking Backpack!

$
0
0

Vagabond Bicycle Bags have pieced together a system that allows you to use your bikepacking bags for much more than just on-the-bike. They are running a Kickstarter campaign until early-May in order to get their production in motion…

If you’re into bike travel, you’ll know that it’s not just about the cycling; there’s so much to see and do on foot. Whether that’s wandering through ancient cities, summiting a mountain or jumping on other forms of transport – carrying bags should be easy. The great thing about a modular system is that you can pick and choose the appropriate amount of gear for your activity, and leave the rest behind!

Vagabond Modular Bikepacking Bags Backpack 08

The Vagabond modular bikepacking system includes:
– Ruck Sack Backpack Base
– Handlebar Bag
– Seatpost Saddle Bag
– Frame Bag
– Accessory Bags (Bottle Bag, Accessory Pouch & Satchel Bag)

Vagabond have opted to manufacture their backs in the USA and offer a lifetime warranty on their products.

Vagabond Modular Bikepacking Bags Backpack 01

The complete Vagabond Bicycle Bags Modular System.

Making It Modular


Vagabond Modular Bikepacking Bags Backpack 03

The difference between Vagabond bags, and every other bikepacking product: modularity. The bikepacking bags all clip and strap to the Rack Sack in one way or another.

Vagabond Modular Bikepacking Bags Backpack 05

Vagabond Modular Bikepacking Bags Backpack 04

The video at the top of the page best shows how the clips work; they essentially slide into built-in hooks at the back of the Rack Sack.

Vagabond Modular Bikepacking Bags Backpack 02

The Ruck Sack waist band separates, and can be used to create a waist bag in combination with the Handlebar Bag.

The Key Components

The Ruck Sack Base
This expandable cycling backpack can carry anything from 5-45L of gear. It has a built in hydration sleeve, a laptop sleeve and the important components to clip on the Vagabond bikepacking bags.

Vagabond Modular Bikepacking Bags Backpack 07

The Frame Bag
This dual entry bag features a small and large compartment, filling to about 3 litres. It’s designed to best accomodate water bottle holders, and multiple frame sizes.

Vagabond Modular Bikepacking Bags Backpack 09

The Handlebar Bag

This 5-20 litre handlebar bag features rolls from both ends to improve access to your gear. Two compression strap clips allow you to keep your gear tight on your handlebars, and external bungees provide you with space for a rain jacket or bulky items. One of the cool things you can do with the handlebar bag is take the Ruck Sack waist band, and turn the handlebar bag into a waist bag!

Vagabond Modular Bikepacking Bags Backpack 11

The Seatpost Bag

With a 5-12L capacity, the seatpost and seat bag can take on a lot of gear. This bag has an internal compression strap to suit the quantity of gear you’re taking, and an external bungee provides you with extra space for quick-access gear.

Vagabond Modular Bikepacking Bags Backpack 10

The pricing is as follows:

– Ruck Sack // US $255 ($300 RRP)
– Handlebar Bag // US $85 ($105 RRP)
– Seatpost Saddle Bag // US $102 ($120 RRP)
– Frame Bag // US $100 ($120 RRP)
– Accessory Bags (Bottle Bag, Accessory Pouch & Satchel Bag) // US $42, $37 & $92
– Complete Package (everything included) // US $670 ($840 RRP)

For A Complete List of BikePacking Bag Manufacturers, Click HERE

The post Vagabond Bicycle Bags Go Modular By Making BikePacking Bags That Turn Into A Hiking Backpack! appeared first on CyclingAbout.

Ortlieb Makes Bikepacking Mainstream By Releasing Waterproof BikePacking Bags

$
0
0

There’s very few brands more synonymous with bike travel than Ortlieb. Since their first hand-sewn pannier bags back in 1982, Ortlieb have used the most high-tech waterproof fabrics available to construct hard-wearing gear that is guaranteed to last. This reputation has allowed the brand to perhaps even take the market share of waterproof panniers – an impressive feat!

Given the popularity of bikepacking, it was inevitable that Ortlieb would produce bikepacking bags. But the question was always, when will they come to play?

Well, they are now ready to play in the form of a new waterproof handlebar pack, seat pack and frame bag – the core luggage for any bikepacking setup. The best bit? Their products are available… right now!

The New 2017 Ortlieb Bikepacking Bag Range | Image: Ortlieb-web.de

The New 2017 Ortlieb Bikepacking Bag Range | Image: Ortlieb-web.de

Seat Pack

The most impressive product from the new bikepacking range has got to be the seat pack. It is positively huge, filling to 16.5 litres and making it bigger than almost any saddle bag out there. The shape is a bit different too; it tapers from a narrow profile at the seatpost and opens wide at the back. This allows for maximum thigh clearance at the seat.

If you’re packing light, you can easily roll the seat pack right down to 8 litres. A small grey purge valve is built into the bag which you can open and close when you need to add or empty air (that’ll make for some tight packing). The seat pack is not the lightest available, but at 430g it’s no porker either. It can be had for US $160.

Ortlieb Bikepacking Bags Seat Pack 01

Image: Ortlieb-web.de

Handlebar Pack

The handlebar bag is not too dissimilar to other roll-design bags. The two-way roll closure gives you access from both sides and the reflective patches will have you seen from vast distances.

Although similar to other bags in many ways, the mounting is especially neat on the handlebar pack. High density foam and a plastic strut space the bag away from your bar. A velcro strap wraps around the handlebar, with the underside coated with rubber to prevent movement on the bar. A heavy duty clip strap then holds everything firmly in place. Down a bit lower, a velcro headtube frame strap triangulates the bag further. This bag works out a little bit heavier than other bags at 417g, and can be purchased for US $135.


Ortlieb Bikepacking Bags Handlebar Pack 01

Image: Ortlieb-web.de

Ortlieb Bikepacking Bags Handlebar Pack 02

Image: Ortlieb-web.de

Accessory Pack

The Accessory Pack attaches directly to the front of the handlebar pack and adds 3.5 litres to in overall capacity. It mounts via four webbing loops which grab onto the handlebar bag’s front clips – a super clean design really. The single front clip is a really neat feature to have on the front of your bike too! You can get this extra bag for US $75 and will add 207g to your swag.


Ortlieb Bikepacking Bags Accessory Pack 01

Image: Ortlieb-web.de

Frame Bag

The Ortlieb frame bags will require a 6-12 month wait before it is released… I’ve heard no word as to why. They’ll be available in both 4 and 6 litre capacities and will tip the scales at 174g and 206g respectively. I’ll let you know when you can get your hands on one.

Image: Ortlieb-web.de

Image: Ortlieb-web.de

What Does This Mean for Current Bikepacking Bag Manufacturers?

The current crop of bikepacking bag manufacturers are going to need to maintain their presence in the market. It will make sense for them to develop a point of difference between mainstream brands like Ortlieb and Blackburn, by going lighter, more custom, using the newer fabrics, or by stitching crazy patterns and colours. I’m really looking forward to the boundaries of these bags being pushed by everyone involved!

Image: Ortlieb-web.de

Head Over HERE for a Complete List of Bikepacking Bag Manufacturers!

The post Ortlieb Makes Bikepacking Mainstream By Releasing Waterproof BikePacking Bags appeared first on CyclingAbout.

List of Ways To Theft-Proof Your Wheels and Secure Components: Locking Security Skewers, Seatpost Locks and More

$
0
0

When travelling with my bikes, I like to be pretty meticulous with their security. It’s for my own piece of mind, but also due to the practicalities of not losing THE most important tool in my travel arsenal – my bike! I’ve recently had a few friends who’ve lost wheels and seatposts while their bikes have been locked up on the street, which has prompted me to put together this resource.

I’ve written about the best bike locks before. In that same resource I’ve also compiled a list of bike locking tips which should help keep your bike safe on your travels.

This article will inform you with the various ways to make your wheels and components completely theft-proof.

Product Design

Most of these products have a tool or ‘key’ specifically designed to undo bolts on your bike. The higher-end components will be available with hundreds of different keys, and are designed to be really hard to remove with chisels, blades, drills, bolt cutters and grippers. Cheaper models will be sufficient in deterring casual thieves.

Pitlock are probably regarded as the industry-best – they offer 256 different key combinations and use stainless steel components. Pitlock also have their own bolt security system called Pitstopper.

Wheel Security

A great way to ensure that your wheels are safe from theft is to employ a set of security skewers. These will replace your existing quick release or bolt on skewers. 

Atomic22 Infiniti3D // £ 64
The Atomic products look to be some of the highest-quality available, and are all made in the UK. You can opt to get the skewer lengths perfectly made for your bike, or buy a “tribe” which includes 1/64 product keys. But before you go ahead and purchase this product, get confirmation from Atomic22 with whether they’re still trading. It seems many people have recently placed orders for this product to not receive them!

The Atomic22 Infiniti 3D locking skewers look the business!

The Atomic22 Infiniti 3D locking skewers certainly look the business.

Delta Hublox // US $29
The Delta triangle tool will undo this specifically designed wheel skewer, deterring casual thieves.

Delta Hublox Skewers

Delta Hublox Skewers

IXOW Wheelguard Gravity Skewers and Nuts // £25
These gravity skewers need to be flipped upside down in order to undo them. It looks like these skewers are the same product as the Kryptonite option below (I can only assume Kryptonite licensed the design off IXOW).

IXOW Wheelguard Gravity Skewers

IXOW Wheelguard Gravity Skewers

Kryptonite Gravity WheelBoltz and Wheelnutz // £25
These rather innovative nuts/bolts will only undo if the bike is upside down. Assuming your bike is locked to a pole and the thief even knows what they are – they’ll have a hard time removing your wheels.

The Kryptonite Wheelnutz and Wheelboltz need to be inverted in order to undo them.

The Kryptonite Wheelnutz and Wheelboltz need to be inverted in order to undo them.

Nutlock Safety Skewers // US $49
Similar to many other products here, the NutLock uses its own tool to remove the nuts. They have a video on their site showing just how hard it is to break them due to their shape.

Nutlock Safety Skewers

Nutlock Safety Skewers

Pinhead Quick Release Wheel Locks // US $59
The Pinhead products are designed to cover both quick release systems and bolt-on styles. Their Pinhead key can be used with their other Pinhead components listed below.

The Pinhead skewer fitting.

The Pinhead skewer fitting. Image: Huckleberry Bicycles

Pitlock Locking Skewers // US $69
Pitlock are the gold standard when it comes to wheel security, with stainless steel fittings and 256 different keys. They’re a little bit more expensive, but from most accounts – worth the investment.

A Pitlock skewer mounted to a bike. Image: Elfritzel.de

A Pitlock skewer mounted to a bike. Image: Elfritzel.de

Quick Caps Skewer Locks // £33
These caps are essentially just small padlocks for your existing skewers.

Quick Caps lock your existing skewer closed.

Quick Caps lock your existing skewer closed.

Sphyke Combination Security Skewers // €45
Not convinced you can keep a key safe? How about skewers with a combination code release? Very neat!

The Sphyke combination security caps use a three-digit locking mechanism to protect your wheels.

The Sphyke combination security skewers use a three-digit locking mechanism to protect your wheels.

TransX, ETC & Other Generic Security Skewers // £19
The pentagon, rather than hexagon shape of these tools prevent thieves from easily being able to take your wheels off.

The pentagon-shaped bolt head of the Trans X Security Skewers. Image: Parkers of Bolton

The pentagon-shaped bolt head of the Trans X Security Skewers. Image: Parkers of Bolton

Velo Orange Anti-Theft Skewers // US $16
These skewers require a specifically-designed allen key in order to undo them, deterring most casual wheel thieves.

Velo Orange Anti Theft Skewers

Velo Orange Anti Theft Skewers

Zefal & OnGuard Locking Skewers // £27
Like the Kryptonite option, these skewers are designed with gravity in mind. Simply flip your bike upside down and undo your quick releases. Good for deterring casual thieves.

Zefal Lock n Roll Security Skewers

Zefal Lock n Roll Security Skewers

Seatpost Security

Pinching your saddle and seatpost is generally just a 10 second job with an allen key. Here are some measures you can go to to make sure these integral parts don’t go wandering.

Atomic22 Seatpost Lock // £34
These anodised aluminium seatpost clamps look great and come with 1/64 specially designed keys. But before you go ahead and purchase this product, get confirmation from Atomic22 with whether they’re still trading. It seems many people have recently placed orders for this product to not receive them!

Atomic22 Seatpost Locks come in many anodised colours!

Atomic22 Seatpost Locks come in many anodised colours!

IXOW SafeRing Gravity
The Safering needs to be flipped upside down in order to undo the bolt. Great for deterring casual thieves.

IXOW Safering Seatpost Lock

IXOW Safering Seatpost Lock

Pinhead Seatpost Lock // US $39
The Pinhead seatpost clamp uses the same key as the skewer locks.

Pinhead Seatpost Lock. Image: BikeRumor.com

Pinhead Seatpost Lock. Image: BikeRumor.com

Pitlock Seatpost Binder Lock // US $61
The Pitlock key designed for your wheels and other components can be used with this saddle clamp too.

Pitlock Seatpost Binder Lock. Image: Michael Richards

Pitlock Seatpost Binder Lock. Image: Michael Richards

Sphyke C3N Combination Saddle Clamp // €29
The combination bolt system by Sphyke can be bought as a complete saddle clamp, or you can add their bolt and combo dial to your existing clamp.

Sphyke C3N Seatpost Lock

Sphyke C3N Seatpost Lock

Component and Bolt Security

It’s possible to secure every nut and bolt on your bike with these security solutions. 

Atomic22 Secure Bike Bolts & Pedals // £26 (2 bolts)
Atomic22 can create specially-designed bolts for anywhere on your bike. But before you go ahead and purchase this product, get confirmation from Atomic22 with whether they’re still trading. It seems many people have recently placed orders for this product to not receive them!

Almost all bike bolts can be made secure with Atomic22.

Almost all bike bolts can be made secure with Atomic22.

Hexlox Bolt Locks // €49 (5 bolts)
The Hexlox bolt kit is pretty clever. The system uses magnets to secure a fitting inside bolt heads (4, 5, 6mm) on your bike so that they cannot be used. A special key (1/999) is used to take the magnetic piece out of your bolt head. It seems to be a really simple and lightweight way to secure components to your bike – available July 2016. 

Hexlox Bike Lock System

Hexlox Magnetic Bolt Locking System.

Pinhead Headset Lock // US $29
The Pinhead lock requires their specially-designed tool to remove the headset top cap from your bike. This is the same tool as your wheels and seatpost clamp.

Pinhead Headset Lock for Bikes

The Pinhead Headset Lock. Image: Huckleberry Bicycles

Pinhead Saddle Lock // US $39
The Pinhead lock clamps just below your seatpost bolt so that it obscures its access.

Image: Confessions of a Bike Junkie

The Pinhead Saddle Lock. Image: Confessions of a Bike Junkie

Pitlock Pit Stopper // US $15
Again, Pitlock are at with a simple product that will secure your bolts. The PitStopper lives inside any bolt of your choosing, and can be removed with a special reverse-threaded bolt/key. For US $15 you will get two bolts and the removal key. 

Pitlock Pit Stoppers

Pitlock Pit Stoppers.

Sphyke C3N Combination Saddle Bolt // 24 Euros
Found in various styles, these combination bolts will replace a bolt at your saddle interface, making it hard to remove the saddle.

Sphyke C3N Combo Saddle Lock

The Sphyke C3N Combination Saddle Lock.

The post List of Ways To Theft-Proof Your Wheels and Secure Components: Locking Security Skewers, Seatpost Locks and More appeared first on CyclingAbout.

My New Book: Page Sample from the 2016 Touring Bicycle Buyer’s Guide!

$
0
0

Recently I’ve been working pretty hard to bring you the most comprehensive touring bike book in the world!

Like other touring bike books, I’ll guide you through the core information like bike sizing, the different types of touring bike, and pros and cons of selecting every part. It’s starting to read really well, and I think it will make sense to those completely new to bikes. I’m writing summaries at the bottom of every page so that you don’t have to read in-detail about everything if you don’t want to.

But what makes this book a game-changer is the bike listing section (free updates yearly!) which allows you to compare bike sizing and other metrics.

Page Sample

This is just one of the pages in the touring bike listings section of the book.

This is just one of the pages in the touring bike listings section of the book.

Let Me Clarify My Touring Bike Comparison Metrics:

Frame Sizing: Manufacturers all measure their bikes in different ways, so I use a universal sizing metric which allows you to directly compare frame sizes between different brands. What that means is that you can test ride a non-touring bike at your local shop (like a road bike), match the metrics to those in the book, and be confident that the bike they order is the right size for you!

Brand/Model: The company and model of each bike in the listings.
Price & Value Rating: I’ve listed the retail price and have created my own value rating on each bike.
Region: This is the region that the bike is most-commonly found in.
Frame Material: After reading about frame materials, you’ll instantly know which bikes to look out for.
Gear Range: I’ve calculated the minimum and maximum gear of each bike for your comparison.
Steering Speed: This is the ‘trail’ of each bike, which determines how nimble the bike’s steering is.
How Upright: Using the universal metric, I create a ratio which determines how tall the front of the bike is in relation to the bike’s length.
Chainstay Length: To give you an idea of how much pannier clearance you’ll have, I provide chainstay lengths.
Brake Type: After talking the pros/cons of each brake, I list what brakes each bike comes with.
Shifter Type: How do you change gears on each of the touring bikes?
Max Tyre Width: If you’re after a comfortable ride or are heading off-road, this metric is king.

The Book Should Be Available late-May 2016!

Join the mailing list (no spam, promise!) to get notified when it is released.

The post My New Book: Page Sample from the 2016 Touring Bicycle Buyer’s Guide! appeared first on CyclingAbout.

Video: See the World 5 – Where the Mountains Go (USA)

$
0
0

Iohan makes some of the rawest bike travel videos out there. They’re long, but showcase a lot of scenery and conversations he has throughout his trips. The POV-style filming makes you really feel like you’re along on the ride too.

Episode five is a 90-day journey along the Great Divide Mountain Bike Route (GDMBR) and Continental Divide Trail (CDT) in the USA. You can read Iohan’s blog series about his trips HERE.

See The World Episodes

See the World 1: The North (1/2)
See the World 1: The North (2/2)
See the World 2: Alaska
See the World 3: Great Divide in Winter
See the World 4: National Parks

See The World 5 Iohan

The post Video: See the World 5 – Where the Mountains Go (USA) appeared first on CyclingAbout.

A Look At The New 2017 Shimano Deore XT T8000 Touring and Trekking Groupset

$
0
0

Shimano have just released images of their latest touring bike groupset – T8000, and it looks great! As with most things touring, there’s not too much new technology to report, which is sensical given Shimano is attempting to achieve the best reliability and durability amongst touring groupsets.

One thing is for sure though – the finish and classic styling of this latest iteration is exceptional.

Shimano has decided to stick with 10 speed chains and cassettes, unlike their XT mountain bike groupset which was recently updated to 11 speed. This is presumably because many bike shops globally will not have stepped across to 11-speed MTB options yet.

The cassettes for this groupset are a direct carry over, using existing 10 speed models in 11-32t, 11-34t & 11-36t options. The 11-36t compatibility is actually new for 2017, as the derailleur’s capacity has been modified slightly to accommodate the two extra teeth. That will give you one extra gear inch for when your climbs really ramp up.

Unfortunately there is no STI gear shifter option with this groupset, despite the fact that so many tour with road handlebars. Luckily J-Tek have come to the party with a ratio-changing pulley to mate 10 speed STI shifters with the XT T8000 touring derailleur. Or another option to look at is using Gevenalle thumb shifter levers.

Welcoming Shimano XT T8000 to the line up.

Welcoming Shimano XT T8000 to the line up.

The XT Hollowtech II crankset features an outer gear guard, which will protect your pants from collecting the grease from your chain. It’s available in the same chainring sizes as before; 48t/36t/26t.

The mirror black and silver finish of the cranks looks very sharp.

The mirror black and silver finish of the cranks looks very sharp.

The dynamo hub looks to only offer a new finish over the outgoing T-785. It can be assumed that internally, the hub is likely the same. The XT hub is a bit of a winner at the price point it is.

Shimano XT T8000 Touring Trekking Dynamo Hub 01

One of the highlights of the new groupset is the pedal update. The T8000 pedals are now running replaceable pins to replicate the feel of a high-end flat pedal. I’ve completed over 30,000km on my current T780 pedals and will be looking to replace them with a set of these when the time comes! It’s my experience that you can’t beat Shimano pedals on durability.

The XT pedals have been revised to incorporate replaceable pins for additional traction.

The XT pedals have been revised to incorporate replaceable pins for additional traction.

The shifters and derailleurs have received minor updates only. The derailleur has changed to a lower profile ‘Shadow’ mounting system, and has received minor adjustments to its capacity to accommodate that bigger 11-36t cassette.

Shimano XT T8000 Touring Trekking Shifter 01

Shimano XT T8000 Touring Trekking Derailleur 01


The T8000 hydraulic brake levers employ a long blade so you can enjoy the additional power of two or three finger braking. It’s my experience that Shimano XT brake calipers are the business too, if you indeed wanted hydraulic disc brakes on your touring bike.

Shimano XT T8000 Touring Trekking Brake Lever 01

The Shimano XT T8000 Groupset Should be Available in September 2016.

The post A Look At The New 2017 Shimano Deore XT T8000 Touring and Trekking Groupset appeared first on CyclingAbout.

The Monkey Lab’s Surly Troll Is A Touring Bike That Could Survive The Apocalypse

$
0
0

Cycle Monkey are the USA distributor for high-end touring components like Rohloff hubs, Gates Carbon Drive and SP-Dynamo hubs, as well as touring bikes by Tout Terrain and Shand. Their bike build blog (The Monkey Lab) features some nice custom builds using some of my favourite touring parts.

For this Surly Troll build, or “Trohloff” due to the fact that it employs the 14 speed Rohloff rear hub – it wasn’t just a case of ordering all the bits and throwing it together. This customer wanted to be able to split the frame in two so they could reduce the cost of flying, and also wanted to pair a Gates Carbon drivetrain to their bike to reduce any maintenance.

So The Monkey Lab sliced open the frame, added some S&S couplers, added a frame splitter for the belt, and powdercoated it all white again. The results are great!

Surly Troll Trohloff Touring Bike 02

The Surly Troll is designed with Rohloff use in mind with its horizontal dropouts and torque arm slot. The key benefit of a Rohloff hub is that your gears are all enclosed in a sealed unit, impervious to mud, grit and grime. They’re almost completely maintenance free when compared to a derailleur drivetrain.

Surly Troll Trohloff Touring Bike 05

With a frame splitter installed into the seatstay, this Trohloff can use a Gates Carbon belt. Given that I managed to get 30,000km out of a single belt while I was travelling around the world, this drivetrain is the real-deal for touring. The only maintenance I ever performed was a quick belt clean with some water and a toothbrush every month or so.

Surly Troll Trohloff Touring Bike 07

This bike uses another of my favourite bits of off-road touring gear, the Cane Creek Thudbuster seatpost. On roads with lots of holes and corrugations, this seatpost dampens most of the vibrations and big hits coming up through the bike to keep you as comfortable as possible.

Surly Troll Trohloff Touring Bike 03

This Trohloff makes use of a Tubus Logo steel rear rack (another of my favourites), Schwalbe Marathon Mondial tyres (yet another of my favourites – what other tyre can survive 25,000km of use?) and Planet Bike Cascadia fenders.

Surly Troll Trohloff Touring Bike 06

A dynamo system has been set up with a switch on the handlebars to power either USB devices or the dynamo light set. The Busch und Muller Luxos U is a fantastic integrated system that takes care of everything. Given how many devices people carry these days, it’s always nice to be able to top up your electronics while going about your day.

Surly Troll Trohloff Touring Bike 04

SP Dynamo PD-8 hubs are proving quite reliable over time, and given they offer a significant cost-advantage over a Schmidt – they’re becoming more and more popular.

Surly Troll Trohloff Touring Bike 01

The Surly Troll is a pretty ideal bike for off-road, world-conquering adventures. The 26″ wheels will fit large volume 2.7″ wide tyres. The frame can be run with a Rohloff or derailleur drivetrain depending on your budget. It will run v-brakes, cantilevers or disc brakes. There’s a trailer mount on the dropout and braze-ons all over the bike for porteur racks, Anything cages, OS bidons, fenders and racks. And with the couplers and belt drivetrain – it’s even more sweet.

Thanks to Cycle Monkey for providing the images and putting together such a tough bike!

Build Spec

Frame: Surly Troll
Fork: Surly Troll
Headset: Hope Threadless
Stem: Thomson X4
Handlebar: Salsa Salt Flatbar
Shifter: Rohloff twist
Grips: Ergon GP-4
Seat post: Crane Creek Thudbuster
Saddle: Brooks
Seat Clamp: Surly
Front Hub: Shutter Precision PD-8
Rear hub: Rohloff SPEEDHUB 500/14
Spokes: Sapim Race
Nipples: Sapim Brass
Rims: Velocity Cliffhanger 26″
Tires: Schwalbe Marathon Mondial
Cranks: Shimano Deore XT
Pedals: Shimano XT Touring
Bottom Bracket: Hope, mountain
Chain ring: Race Face
Rear Sprocket: Rohloff
Chain: Gates Carbon Drive Belt
Brakes & Levers: Avid BB7
Rotors: Magura
Front Light: Busch und Muller Luxos U
Rear Light: Busch and Muller Toplight Line Plus
Fenders: Planet Bike Cascadia
Rear Rack: Tubus Logo Evo

The post The Monkey Lab’s Surly Troll Is A Touring Bike That Could Survive The Apocalypse appeared first on CyclingAbout.


This Firefly Is The Cover Bike of the Bicycle Touring Buyer’s Guide 2016

$
0
0

I wanted to find a bike that made people drool all over the cover of the 2016 Bicycle Touring Buyer’s Guide.

So I took to my list of the 30 nicest touring bikes in the world to find a suitable candidate, but it was this relatively new build from Firefly that took the cake!

Firefly are three frame builders (Kevin, Jamie and Tyler) who sharpened their tools at custom frame manufacturer Independent Fabrications, before forming their own brand in 2011 which specialises in titanium frames. Based in Boston USA, they’ve quickly built a strong name for themselves by constructing some jaw-dropping bikes for people with a taste for detail.

Welding a Firefly Titanium Bicycle Frame 03

The cover bike of the 2016 Bicycle Touring Buyer’s Guide started life as a pile of titanium in a box. You can see that the frame tubes have already been shaped in a unique way – a clue that this Firefly will NOT be any old touring bike. Yep, it’s going to be pretty darn special…

Welding a Firefly Titanium Bicycle Frame 01

Welding titanium is a bit more complex than steel or aluminium. This is because oxygen is a contaminant to molten titanium and as a result, causes substandard welds. This Firefly frame has been sealed off completely, and replacing the oxygen is pure argon gas which ensures the titanium welds can be as strong as possible.

Welding a Firefly Titanium Bicycle Frame 02

The bike has been built around a Shimano Alfine 11 speed internally geared hub, and a Gates Carbon Drivetrain. The hub shifts its gears via an electric motor, allowing you to pair it with Shimano Di2 road levers. Shimano have been working pretty hard to bring automatic shifting to their e-Bikes based on your travelling speed and pedalling cadence. I wouldn’t at all be surprised if this technology made it to their Alfine gear hub bikes sometime soon.

Firefly Titanium Touring Bike 02

One of the most defining features of all Firefly bikes is the anodising. In order to anodise titanium, Firefly mask off the sections they want to colour, then apply trisodium phosphate to the surface with an electrified brush. When the brush is set to different voltages it can achieve different colours. Firefly have been doing anodising for a while, so they’re pretty good at working the colours!

Firefly Titanium Touring Bike 03

Tubus stainless steel racks adorn this titanium beauty, matching the finish of the frameset. A Schmidt dynamo hub harvests power for the front and rear lights using magnets inside the hub body.

Firefly Titanium Touring Bike 04

The final result is a lightweight road-going tourer which will require very little maintenance! Wipe off the belt, recharge the Di2 battery and GO. You could even pull off the fenders, run slightly wider tyres and it’ll be great for gravel road adventures too. What a cracking bike!

Firefly Titanium Touring Bike 01

I think this is a pretty worthy candidate for the cover of the 2016 Touring Bicycle Buyer’s Guide. What do you think? For more Firefly builds, head to their Flickr page.

If You Want to See 30 More Beautiful Touring Bikes, click HERE

The post This Firefly Is The Cover Bike of the Bicycle Touring Buyer’s Guide 2016 appeared first on CyclingAbout.

What’s the Speed Difference Between Front/Rear Panniers and BikePacking Bags? Results

$
0
0

A few months ago I spent a day testing different weights in my panniers to determine how those differences would affect my travelling speed. On one test run I decided to use front instead of rear panniers, and realised there was a speed difference. It worked out to be around five minutes on a hilly 100km ride, or the equivalent of carrying five less kilograms.

That experience spurred on the idea to determine the aerodynamic differences between front panniers, rear panniers, both panniers and bikepacking bags on a velodrome. I decided to go around in circles until I’d gathered enough data, using a power meter to ensure that my effort was consistent from start to finish. This isn’t an exact science, I know, but it’s the best I can do without having access to a wind tunnel!

Testing the aerodynamic effects of using rear panniers on my touring bike.

Testing the aerodynamic effects of rear panniers on a local velodrome.

The Experiment

I used an outside velodrome in Melbourne (AUS) as my testing ground. The velodrome is precisely 320.622m long and actually has one metre of up and down for every lap. There was a slight breeze coming from the south but it didn’t seem to change throughout the day.

The bike I used was my Surly Long Haul Trucker touring bike. It weighs precisely 15kg and has Schwalbe Marathon Mondial 40mm tyres installed. I fitted a Stages power meter crank arm to keep my effort of 200w in check. I wore casual clothes, as that is generally my preference on a bike tour.

I tested four different bag configurations on the velodrome. I used Ortlieb Backroller Plus 21L panniers for both the front and rear pannier testing. When testing both front and rear sets, I used the Backrollers on the rear rack and added some Frontrollers to the front. My bikepacking kit consisted of a Revelate 12L saddle bag, half frame bag, top tube bag and handlebar sling with drybag. The overall weight for all setups was identical.

All of my tests runs had a rolling start and were conducted in the same gear from start to finish. My power fluctuated up a little on one side of the velodrome, and down on the other, presumably due to the elevation changes.

I initially completed 10 laps (~3.2km/2mi) with each bag setup. I then re-tested for another 10 laps with each setup to ensure that my times were consistent. The average speeds and times below are based on all 20 laps for each bag setup.

What about fatigue?
Here’s the deal; I got fatigued, but that didn’t affect the results. How? I picked a power that I knew I could push all day long, so even as I was getting gradually more tired after each test run, the pressure I put through the pedals remained the same from start to finish.

This is the power meter that I used to ensure my effort was consistent between all of my testing.

This is the power meter that I used to ensure my effort was consistent between all of my testing.

Results

Bikepacking Bags – 20 laps @ 200.5w Average Power
38.262 seconds av per lap
119.34 seconds av per kilometre
30.17km/h average speed
Extrapolated Time for a 100km (62mi) Ride: 3:18:54

Rear Pannier Bags Only – 20 laps @ 199.5w Average Power
40.931 seconds av per lap
127.66 seconds av per kilometre
28.20km/h average speed
Extrapolated Time for a 100km (62mi) Ride: +12 minutes (6.5% slower)

Front Pannier Bags Only – 20 laps @ 199w Average Power
40.89 seconds av per lap
127.54 seconds av per kilometre
28.23km/h average speed
Extrapolated Time for a 100km (62mi) Ride: +12 minutes (6.4% slower)

Both F+R Pannier Bags – 20 laps @ 200w Average Power
41.542 seconds av per lap
129.57 seconds av per kilometre
27.78km/h average
Extrapolated Time for a 100km (62mi) Ride: +17 minutes (7.9% slower)

The four different bike setups.

My four different bag setups all weighed the same for consistency in my testing.

Analysis

The effects of aerodynamic drag turned out to be quite significant. Using two panniers on either the front or rear slowed my speed by about 6.5%, while running both sets at the same time stretched that out to 7.9%.

It’s reasonable to extrapolate this data because the number of laps I completed on the velodrome should balance out many external influences. It was reassuring that after completing 10 laps, and re-testing for another 10 laps, that I was within a couple of seconds each time. Should I have completed more laps on the velodrome, there would have been the risk of greater changes in the weather, which wouldn’t have provided a fair comparison between each of the loads that I was carrying.

It’s interesting that there’s very little difference between using front vs rear panniers. While you’d assume that having the front panniers lower to the ground would reduce the effects of aerodynamic drag, my testing demonstrated that the difference is negligible.

As expected, adding a second set of panniers to my bike slowed it down a further 0.5km/h.

Testing the front pannier setup.

Interestingly, I found very little speed difference between the front and rear pannier setups.

Are Aerodynamics Significant?

Absolutely.

Aerodynamics have a very significant impact on your speed, especially when compared to my weight testing. On my hilly test course when carrying 20 extra kilograms it worked out to be 18 minutes slower over 100km. To put that into perspective, that time difference is essentially the same as the difference between bikepacking bags or four panniers with equal weight (17 minutes). That’s a lot!

A Few Thoughts on Aerodynamics

The more distance you’re looking to travel per day, the more aerodynamics matter.
If you’re planning on completing some big days on the bike, then your time savings will become greater and greater with bikepacking bags. For example, if you were riding 200km on a flat route, you could expect a 24 minute saving for the day given the same amount of effort.

The flatter your tour route – the more aerodynamics matter.
You move faster on flatter surfaces, so the effects of aerodynamic drag are greater. For a trip that traverses flat land, it makes even more sense to use bikepacking bags.

The hillier your tour route, or the more weight you have – the less aerodynamics matter.
Aerodynamics play a bigger role the faster you’re moving. As your average speed is reduced in the hills (or with more weight) the effects of aerodynamic drag will reduce too, and the overall time savings have less of an effect.

If you’re carrying bikepacking bags, you’re probably not on a touring bike and you probably have a lighter load.
If you’re using bikepacking bags on the road, you’re probably on a lighter weight bike, with slicker/narrower tyres, and in a more aerodynamic position. The time savings from you bag setup choice are just the beginning, really.

If you're not carrying much, a switch to bikepacking bags can save you a significant amount of time every day.

If you’re not carrying much, a switch to bikepacking bags can save you a significant amount of time every day.

Wrapping Up

While this test is an interesting comparison between travelling speeds with different bag setups, you should ideally choose your bags based on the type of trip you’re doing. If you like carrying comfort items, or if you’re travelling for a long time – then panniers are going to be the most practical solution for you. But if you’re travelling light, you’ll have the option for either setup.

Alee, the aero savings are huge! Should I sell all my panniers?
Don’t do it! Panniers are are awesome for bike travel as they’re:
– Quick to take on/off the bike
– Easy to carry off the bike
– Tough
– Waterproof
– Able to fit all kinds of objects
– Twice the capacity as a complete bikepacking kit (four panniers)

For those tours where you don’t need to carry as much gear, it’s hard to look past using a set of bikepacking bags. They’re light, fit to any bike and force you to pack light – the aero savings are really just the cream on top.

Click HERE For A List of Bikepacking Bag Manufacturers, and HERE For A List of Pannier Manufacturers

The post What’s the Speed Difference Between Front/Rear Panniers and BikePacking Bags? Results appeared first on CyclingAbout.

20 Amazing Photos from My Tour On The 900km Mawson Trail in Australia

$
0
0

I’ve just completed one of the best off-road trails in Australia! It’s called the Mawson Trail and it spans 900km from the Adelaide Hills, straight through the Flinders Ranges and then finishes at the highest town in South Australia; Blinman. The terrain varies greatly from pine forest to rocky outcrop, to sandy desert.

The CyclingTips trip team included two other strong riders, and we were supported by a professional photographer and documentary filmmaker. Trip sponsors included Cannondale Australia (we were on Slates) and Holden Australia (we used the Sportswagon).

I can’t provide too many details about the ride at this stage, but we will have a documentary about the journey available to view soon, along with a big photo album and trip write up. Stay tuned!

All Images by Tim Bardsley-Smith

Day One: 150km

Cycling the Mawson Trail 04

Cycling the Mawson Trail 09

Cycling the Mawson Trail 00

Cycling the Mawson Trail 01


Cycling the Mawson Trail 02

Day 2: 150km

Cycling the Mawson Trail 06

Cycling the Mawson Trail 05

Cycling the Mawson Trail 07

Cycling the Mawson Trail 08

Day Three: 180km

Cycling the Mawson Trail 10

Cycling the Mawson Trail 11

Cycling the Mawson Trail 12

Day Four: 190km

Cycling the Mawson Trail 14

Cycling the Mawson Trail 15

Cycling the Mawson Trail 16

Cycling the Mawson Trail 13

Day Five: 4km

Cycling the Mawson Trail 18

Cycling the Mawson Trail 17

Day Six: 180km

Cycling the Mawson Trail 20

Cycling the Mawson Trail 19

The post 20 Amazing Photos from My Tour On The 900km Mawson Trail in Australia appeared first on CyclingAbout.

The 2017 Bpod PSH’R Trigger Brings Hydraulic Shifting To Your Rohloff Hub

$
0
0

The 14-speed Rohloff hub is a wonderful bit of touring kit – there is no disputing that – but the Rohloff shifter has always been a polarising item for two reasons: it isn’t available as a trigger shifter, and it’s generally hard to fit to a bike with a road handlebar.

I’ve always kept resources which help you with Rohloff shifter workarounds, such as the list of ways to use a rohloff shifter with road handlebars, and information on items like the Gebla Rohbox which allows you to pair STI road shifters and MTB trigger shifters to your Rohloff hub.

But now there is now a new shifter on the block.

Pshr Rohloff Hydraulic Shifter 02

Rohloff Have Recently Been Showing A New Item Called The Bpod PSH’R

The psh’R is a hydraulic shifting system for the Rohloff hub. It’s based around the Acros hydraulic shifter which has been in production for over five years, and is very well proven now. The all-new component is the external shift box at the hub. The shifter works as you’d probably imagine: one lever shifts up, the other shifts down.

Pshr Rohloff Hydraulic Shifter 01

You’re probably wondering why the heck anybody would want hydraulic shifting on their touring bike, and I tend to agree with that sentiment – especially if you’re riding in remote locations like me. The idea behind a hydraulic shifter is to reduce friction in your shifts, and given the system is entirely enclosed, achieve perfect shifting in mud, sand and snow. Realistically, this system would be best used in the developed parts of Europe where hydraulic rim and disc brakes are mainstream, and access to spare parts and capable mechanics is much more common.

Pshr Rohloff Hydraulic Shifter 05

The best application for hydraulic shifting that I can think of is on my touring tandem. There’s quite a bit of friction in the long Rohloff cables from the front of my bike to the rear, so a hydraulic shifter would improve my shifts dramatically. The psh’R hydro shifter will be available in multiple colours to match your bike.

Pshr Rohloff Hydraulic Shifter 07

In development is an integrated road shifter too… I’ll provide you with more details when I can!

Pshr Rohloff Hydraulic Shifter 04

The psh’R hydraulic shifter and shift box will be available for around €500 early next year, and will come in a selection of colours. Keep your eyes on PSHR.ch for more information.

Interested in a Rohloff Hub? Here are 15 Reasons Why They’re Great!

The post The 2017 Bpod PSH’R Trigger Brings Hydraulic Shifting To Your Rohloff Hub appeared first on CyclingAbout.

This Jones Plus Touring Bike With 29×3.0″ Tyres Will Conquer Almost Any Trail

$
0
0

Off-road touring bikes are gracing the rough trails of the world more than ever before, as people discover just how great it feels to get lost in the wilderness. We’re seeing more and more off-road specific touring bikes (and fat bikes) with wide tyre carcusses as standard, as well as their fair share of off-road specific alt handlebars.

Here’s a list of 80 off-road touring bikes to sink your teeth into.

Cycle Monkey, the USA distributor for touring components like the Rohloff hub, Gates Carbon Drive and SP Dynamo hubs have been building all kinds of beasts that are ready to conquer all. The bike featured here, a Jones Plus, is a true highlight of their work in recent times. Other than putting together the build, they’ve customised the frame to suit the incredibly robust carbon belt and Rohloff 14 speed drivetrain.

The brains behind the frame and fork, Jeff Jones – does things different to most. His two unconventional and iconic designs, the 3D Spaceframe and truss fork are both beautiful and confusing. How can something so different exist, and why do the people who ride his bikes constantly rave about them? Is there something in the ultra-slack angles, lengthy fork rake and long chainstays? I’ll reserve my judgement for when I get to give his bikes a proper ride.

‘Plus’ bikes, rims and tyres are relatively new to the world of cycling and come in both 27.5 and 29er sizes. Plus refers to the extra-wide nature of both the rim and rubber. While mountain bike tyres have typically sized up to about 2.0″ in width, Plus jumps to 3.0″ in order create a tyre contact patch which is larger and more grippy than anything of regular width. More grip and a larger footprint means you can ride more technical terrain in comfort, without resorting to the slowness of a fat bike (4 to 5-inch tyres).

Let’s take a closer look at this diamond frame Jones Plus with 29×3.0 tyres.

Jones Plus Offroad Rohloff Touring Bike 04

The Jones uses a Surly Nice steel rack which sits tall and has ample tyre clearance. These racks weigh a tonne (ok, maybe not a tonne – but they’re still over twice the weight of the Tubus equivalent) but are about as solid as it gets.

Jones Plus Offroad Rohloff Touring Bike 10

The bike employs some of the most powerful brakes available – four piston Magura MT7 hydros. Due to the number of brake pistons, the large pads have a huge contact area on the rotor. You’ll typically find these brakes on downhill or enduro mountain bikes, but with 180mm rotors they’ll stop this fully loaded touring bike on a dime.

Jones Plus Offroad Rohloff Touring Bike 01

The gearing system is all hidden away in the Rohloff hub shell. A series of planetary gears inside an oil sealed chamber provide a similar gear range to many derailleur setups. I’ve been using Rohloff hubs for years and love the maintenance-free nature of them. Cycle Monkey added a pickup point on the inside of the left seatstay for the Rohloff OEM2 axle plate to grab on to, as well as adding Rohloff cable bosses along the length of the frame. The bike was then powdercoated to hide the modifications.

Jones Plus Offroad Rohloff Touring Bike 03

Jones Plus Offroad Rohloff Touring Bike 02

Jones Plus Offroad Rohloff Touring Bike 09

On the drive side of the bike you’ll find a Gates Carbon Drivetrain. The Jones Plus isn’t designed around this long-lasting and silent drive option, so Cycle Monkey took a section out of the chainstay to add in a simple splitter which permits the one-piece belt into the rear triangle of the bike. The owner of this bike can expect over 30,000km out of a single belt – if they play their cards right!

Jones Plus Offroad Rohloff Touring Bike 06

Jones Plus Offroad Rohloff Touring Bike 05

Jones Plus Offroad Rohloff Touring Bike 08

This all-black Jones build is finished off with the iconic truss fork. This fork design absorbs bumps and hits better than a standard rigid fork without compromising on rigidity. Jones Loop Alt handlebars provide an upright bike position with ample places to locate your hands.

Jones Plus Offroad Rohloff Touring Bike 07

The estimated cost of this build is around US $6500. You don’t need to spend this kind of money to get a 29+ touring bike though! Surly make the ECR @ $2099 and Salsa have a complete Deadwood @ $2599. Or if you like the Jones specifically, complete versions of the Plus start at $3785.

Thanks to Cycle Monkey for providing the images and customising this unique bike!

Build Spec

Frame: Jones Plus
Fork: Jones Plus 142mm Truss Fork
Headset: Hope Threadless
Stem: Thomson X4
Handlebar: Jones Loop H-Bar
Shifter: Rohloff Twist shifter
Grips: Jones ESI Chunky Grips
Seat post: Thomson Elite
Saddle: Selle Anatomica
Front Hub: Hope Pro Fatsno
Rear hub: Rohloff SPEEDHUB 500/14
Spokes: Sapim Force
Nipples: Sapim Brass
Rims: Sun Ringle MuleFUT 29+
Tyres: Maxxis Chronicle 29 X 3.0″
Cranks: Race Face Turbine Cinch
Pedals: Shimano XT
Bottom Bracket: Hope
Chain ring: Gates Carbon Drive
Rear Sprocket: Gates Carbon Drive
Chain: Gates Carbon Drive belt
Brakes: Magura MT7 and 4-Piston
Rotors: Magura 180mm
Rack: Surly Nice Rack

Click HERE for a List of 80+ Off Road Adventure Touring Bikes

The post This Jones Plus Touring Bike With 29×3.0″ Tyres Will Conquer Almost Any Trail appeared first on CyclingAbout.

The New PDW Bindle Rack Is A Sway-Free SaddleBag Option For Bikepacking

$
0
0

Portland Design Works (PDW) have just released the seatpost rack that they were first showing at Interbike last year. The PDW Bindle Rack went on presale on the 14th of June, and sold out within eight hours, indicating that there’s certainly demand for a firmer saddle bag design with no side-to-side sway.

The rack is made out of alloy, tipping the scales at just 350g (13oz). With a lightweight drybag it works out to be about 100g (3.5oz) heavier than a dedicated bikepacking saddlebag. It mounts to 22.0-31.6mm diameter seatposts with just a 5mm allen key. Compression straps wrap around a separate drybag to keep it all in check.

The PDW Bindle drybag rack is a more stable alternative to bikepacking saddle bags.

The PDW Bindle drybag rack is a more stable alternative to bikepacking saddle bags.

A key advantage for the PDW Bindle Rack is that you can mount it on small bikes that typically have little clearance between the rear tyre and saddle. By mounting the rack at a height of your choosing, the saddlebag will compress and fit within whatever dimensions you provide it. You’ll also be able to pack the drybag with less items and experience no drooping.

The Bindle Rack is available with a 14 litre Revelate Designs Terrapin drybag for US $30 extra (that’s a bit cheaper than what you’ll get if you order the drybag separately). The Terrapin drybag offers a tapered shape which fits this rack perfectly. This bag also features an air purge valve (like the Ortlieb saddlebag) to compress everything in tight.

The Bindle Rack helps to reduce side-to-side sway typical of many bikepacking saddle bags.

The Bindle Rack helps to reduce side-to-side sway typical of many bikepacking saddle bags.

You can order the Bindle Rack through any PDW dealer, or alternatively you can wait til mid-July and get this seatpost rack directly from the PDW website for US $88.

Tech Details

Rack mount fits seatposts 22.0-31.6mm
Rack deck measures 133×343 mm (5.25×13.5″)
Total Length: 432 mm (17″)
Rack weight: 350g (13 ounces)
Rated to 5.34 kgs (12 lbs)

PDW Bindle Bikepacking Rack With Drybag 2

Don’t Forget To Check Out My List of Bikepacking Bag Manufacturers

The post The New PDW Bindle Rack Is A Sway-Free SaddleBag Option For Bikepacking appeared first on CyclingAbout.

Story Blog: A Bike Ride Along The 900km Offroad Mawson Trail in Australia

$
0
0

In May this year I headed out on a bike trip that would take me from the ocean to the Outback. The conditions were often testing, but the scenery and overall experience was simply phenomenal. This is my story.

This story was originally written for CyclingTips in partnership with Cannondale and Holden Australia.
Professional photos by Tim Bardsley-Smith. Check out his full gallery of photos HERE.

Cycling the Mawson Trail 15

©Tim Bardsley-Smith

Prologue

Our wheels were whirring underneath us, bouncing through corrugations that had filled with water overnight. Dirt and grit was getting picked up and flung at our faces as we recorded a video diary about the day’s theme: wet floors and resistance training. Having already clocked up 700km on the Mawson Trail, there was no doubt this day was going to have its challenges.

The road lost elevation quickly and we soon found ourselves navigating our way into a dry creek bed. Not even a solid night of rain could wake this beast up. We confidently carried our speed in and over this sleeping beauty and were flicking our shifters to find the perfect gear to get us back to flat ground. But while the dormant river may have permitted our crossing, she didn’t consent to us escaping without a fight.

Spinning and whirring as tiny raindrops fell from the sky, our tyres started to squirm; the power we were laying down was disappearing as our wheels spun without any forward propulsion.

We looked down and it was peanut butter mud. Not just ordinary peanut butter — this was the crunchiest, stickiest, most impossible-to-wipe-off-your-knife kind. Rocks, thorns and small branches made up the next layer, and when there was enough structure in place, a new layer of peanut butter wrapped itself around our tyres until our chainstays were fully sealed closed.

This wasn’t what we had envisaged four days earlier when we were sipping our lattes in Adelaide.

The Mawson Trail starts in the hills behind Adelaide, meandering north along dirt roads and 4×4 tracks that pass world-renowned wine regions, giant wind turbines, concrete aqueducts, rusty old gates and the gloriously red Flinders Ranges. The last trail marker on the verandah of the Blinman Pub indicates you’ve finished the ride, some 900km from the hustle and bustle of Adelaide.

The guys that put their hands up for this trip were Dan Bonello (aka BonBon), a Continental-level racer of road bikes and model for flashy kit manufacturer Attaquer; Ben May, a quiet achiever who banks more kilometres than most in preparation for the self-supported, 4,500km long Transcontinental Race; and me, Alee Denham, a rider of bikes across dozens of countries and multiple continents in order to meet the people of the world.

Mawson Trail Map

Mawson Trail Map

Day 1: Adelaide to Kapunda (149km)

The roads out of Adelaide were pedestrian, but at a certain point we reminded each other that these would be the last traffic lights for a long time. We made our escape from the city fun by taking shortcuts through parkland, which immediately demonstrated the capabilities of the Cannondale Slate as an off-road bike.

The autumn colours flooded our vision as we twisted our way up Gorge Road, a well-known haunt for both local riders and WorldTour riders like Simon Gerrans who start their season early at the Tour Down Under.

Near the start of the infamous Corkscrew Road climb, we pulled off the smooth bitumen and onto the official start of the Mawson Trail. The surface quickly turned to dirt and we were in our lowest possible gears which, as it turns out, weren’t low enough.

A photo posted by Ben (@autofotoben) on

The climbing was generally short and steep. Not the steep you’re probably thinking, but more like 26%+ gradients at times. As a result, our 42mm slick tyres were breaking traction on the loose dirt as we monstered the gears, trying not to drop cadence. Luckily we are all rather experienced riders and had the ability to power the steep sections while recovering on the moderate gradients. But we aren’t ashamed to admit there was one particular hill that beat us.

Given the quick elevation change, the views over Northern Adelaide and Mt. Misery were stunning. The skies had opened up nicely by the afternoon, making the distant landscapes look razor sharp. At the highest elevation of the day we were climbing through kilometres of pine forests that are quite the contrast to the dry and dispersed nature of the Australian bush.

Back on fast roads again, we entered what we dubbed, “strada bianche”, white dirt roads approaching the Barossa Valley. Riding in an echelon, it felt like we were in Central Italy with a chasing peloton of classics specialists, as we sat low on our Slates to beat the headwinds coming in from the north. With fresh legs, we were able to push the tempo hard for periods, although we all knew deep down that what we were doing was totally unsustainable with five long days to go.

By late afternoon we were checking our weather apps to determine how much light was left for the day. Sitting on the ground in the middle of a supermarket carpark, trying to stuff bananas, chocolate and bread into our mouths, we determined there was just 45 minutes to find somewhere to stay.

As the sun set in the west, a positively gigantic full moon was rising in the east, lighting our way to one of the older European settlements in South Australia – Kapunda.

Day 2: Kapunda to Mount Byron (153km)

Waking up in a submarine-style triple bunk, we could all hear the gale force winds outside. It wasn’t at all reassuring to peel back the curtains and see strong northerlies bowing every tree in sight.

There was barely a murmur from any of us as we rolled out of town. We didn’t need to discuss the 50km/h headwind – instead we just flicked into our small front chainrings and spun away. You know the wind is strong when your uphill and downhill speeds are the same!

For whatever reason, farmers were plowing their fields on this day and losing huge amounts of topsoil. It seemed like a futile exercise, and we joked that they could probably take some advice from us city slickers about taking the day off and trying again tomorrow.

A photo posted by Ben (@autofotoben) on

We were in serious need of the Red Ambulance (aka Coca Cola) after just 30km. As we took a break from staring at our stems, we could see on the horizon two guys crouching behind some bushes. It was our film crew, busy getting banger shots of us suffering in the wind.

Tim Bardsley-Smith was behind a gigantic lens and Mal Bloedel was documenting us through moving pictures. Tim and Mal weren’t just our film crew; they were propping up the whole adventure. They were the guys who did our shopping, booked our accommodation and checked if we were ok every hour or two. These guys are what one would call ‘bloody legends’.

The CT teamcar was parked on the side of the road, waiting to be pillaged by three cyclists desperate for caffeine, sugar and a good break. While we lay in the long grass with our legs up, Mal fired questions our way to try and capture moments of weakness. Hopefully he got in quick enough because the Black Doctor (aka Coca Cola) was performing miracles and we were soon feeling on top of our game again.

Cycling the Mawson Trail 05

©Tim Bardsley-Smith

A slightly uphill yet sheltered bike path in the Clare Valley provided respite from the windy fields. For the first time this day we got to be social on the bike and found out things about each other, like the fact Ben has been with his partner Rishi for over half his 34-year life!

Light rain started to fall as we made our way out to Burra. We were heading into a crosswind that was doing wonders for our average speed, but unfortunately with the rain came energy-zapping mud that slowed us back down again.

A final push through the barren cattle-farming region near Hallett had us finishing at accommodation in the form of a converted train carriage.

Cycling the Mawson Trail 08

©Tim Bardsley-Smith

Day 3: Hallett to Melrose (188km)

Crisp air was forcing its way in and under the carriage door and doing battle with the hot air from our fan heater. Those who felt the cold huddled next to the heater for the best chance of a warm start to the day. Undershirts, jerseys, thermal jackets and rain jackets — everything we owned — were all being used as insulation.

Blue skies, low fog and wind turbines created a picturesque backdrop as we motored along faster and with less effort than the previous days. Sheep were dotted sparsely across the monotonous Australian landscape as we twisted up and over the rolling hills.

Cycling the Mawson Trail 11

©Tim Bardsley-Smith

We peeled off the wide farming roads and onto an aqueduct trail, our first section of proper hiking track on the Mawson.

It’s certainly lovely riding along small and twisty tracks, but we soon discovered that they were littered with closed gates. Although we developed a system whereby one would open the gate, the next would grab the last rider’s bike, and the last rider would close the gate – it was still a tedious affair. Here we also found the famous bindi thorns and our first puncture for the trip.

With all of the fences and gates, kangaroos would end up hopping ahead for long periods of time – even with generous gaps on either side of the trail. The kangaroos rarely let us pass and instead just went full speed parallel to the nearest fence.

We dubbed what they were doing as “Perimetering”. Not too dissimilar to “Everesting”, a Perimeter is when you circumnavigate a notable landmark – the bigger the better. A beginner’s Perimeter might be cycling around Uluru; and an advanced Perimeter could include cycling the entire coast of Australia on a fat bike!

The trail got steep and rocky as we climbed into a small mountain range near Jamestown. As we were tapping up the climb, all we were thinking was how the hell the lowered SS Commodore had made it up this. Tim and Mal were pretty impressed with their driving efforts up to the top, capturing some killer drone footage as we crested with them.

A photo posted by Ben (@autofotoben) on

On the way down the other side, we were moving rocks and large branches from the double track where the Sportwagon needed to go. Watching the V8 wagon roll across deep ruts on the tightest possible angles in order to maximise clearance, was probably nervewracking for the camera guys, but quite amusing to us on the bikes.

For the rest of the day, we were in and out of pine forests, following livestock tracks carved into the hill contours, riding steep 4×4 trails and bombing down wide dirt roads. Despite being the longest day on the bike in terms of time and distance, we were feeling better than any other day given the favourable weather conditions.

Day 4: Melrose to Hawker (183km)

Our alarms went off an hour earlier than usual. We’d organised to go mountain biking in Melrose with some local riders who were keen to help us get some good sunrise images before heading out into the desert. Half-asleep, we rolled into the mountain bike park and were taken straight up one of the steepest trails. Given that we’d already covered 500km over three hard days, this was a rude shock first thing in the morning.

Despite the town being so small, the singletrack in Melrose is well known across South Australia, making for a suitable holiday destination for those who crave adrenaline. After riding through a number of iconic sand-coloured ruins in the mountain bike park, the local bike shop opened up just so that we could talk shop and share caffeine.

The trail out of town followed big farming roads that went in straight lines for as far as the eye could see. It was somehow engaging though; the landscape had changed completely from what we’d previously experienced.

Cycling the Mawson Trail 16

©Tim Bardsley-Smith

The earth was becoming a dark red colour, trees were disappearing and small shrubs were cropping up everywhere – we were now in the Australian Outback. A stud of horses ran alongside us for a few hundred metres, their manes catching the wind majestically as they attempted their very first Perimeter.

Quorn is a beautiful historic town with lots of charm. The local proprietor of the department store-turned café and museum was proud to inform us that horror flick Wolf Creek was filmed in town. That got us wondering if any serial killers were living in the run-down properties out this way. They’d probably have a good chance of luring us in with icy cold drinks and bike cleaning services!

By afternoon the wind picked up, the trails got sandier, the corrugations grew and the desert really started to expose itself. BonBon was clearly feeling good, evident when the cameras appeared and he upped the tempo until the rest of us couldn’t hold on anymore.

As the light disappeared behind the Flinders Ranges, it was a windy slog into Hawker. Despite going downhill, we had to work harder than ever to finish the day off before the temperature dropped.

A photo posted by Ben (@autofotoben) on

Day 5: Hawker to Hawker (4km)

It was 7am and there was heavy rain falling on our tin roof. Ben was looking at the rainfall charts for the next 24 hours, and it looked like there wouldn’t be a single hour of respite. Not only was it wet but the temperature was hovering at around 10 degrees Celcius too – not what us fair-weather cyclists signed up for.

We decided to have a coffee and discuss the potential of altering our route to suit the inclement weather, but there wasn’t really an alternative option that didn’t miss everything.

And so we rode our bikes on the trail – for 4km. And then, as you already know, our bikes got bogged.

A photo posted by Ben (@autofotoben) on

After digging as much mud off the bikes as possible, we locked them into the roof racks and called it a day. We made the decision that we wouldn’t risk taking the car back down into the creek bed, in the event that it wouldn’t get up the other side.

Driving just a few hundred metres away from the creek, it was apparent that just like our bike wheels, the Commodore was fighting for traction as the mud wrapped around the tyres and into the guards.

With the front wheels locked, we were trying to make a right-hand turn but the car was struggling to do anything but go forward. After a bit of pushing and shoving we ended up getting the car straight, but it still wouldn’t go anywhere by itself.
The three of us spindly-legged cyclists plus camera-guy Mal pushed the car slowly up the road until a ridge between the wheels halted all progress. We were properly bogged now.

We called the local service station proprietor who had a good chuckle at the city slickers who decided to drive on muddy roads in their lowered Sportwagon, before deploying a rescue vehicle. As the 4×4 approached our bogged car it slid 90 degrees and almost lifted two wheels off the ground. The peanut butter mud was like ice!

Two older guys muttered to each other about how they would tackle the tow, tying a rope to the back of the car, and dragging it off the muddy road and onto the grass beside it. With the 4×4 shadowing, we were able to drive slowly through the shrubs to the safety of the hard bitumen.

A video posted by Ben (@autofotoben) on

Day 6: Hawker to Blinman North (170km)

Given that we’d lost a whole day, we had some serious ground to cover. Most weather reports had highlighted that “the first 15km out of Hawker” was the worst section following rain, so instead we rode the parallel bitumen to Wilpena Pound. The weather was looking a little dicey, but with the big, wide, sweeping desert views we just didn’t care.

After 50km we had reached our first section of dirt where we prayed both that our wheels wouldn’t clog and the car wouldn’t bog. A 4×4 coming the other way gave us the promising news that there was only a 100m long mud section that might cause us problems – good enough for us!

Cycling The Mawson Trail 15

©Tim Bardsley-Smith

The road passed closely between two mountain ranges that offered great eye candy. The visual pleasure was certainly at odds with the Strava segment called “Corrugation Hell Road”, and for good reason – it’s the roughest section of the Mawson.

It’s a pity we didn’t have access to a helicopter to see the Flinders Ranges from above – a few hundred metres up and these mountains are at their most picturesque. Do yourself a favour and look up some photos of Wilpena Pound.

The Mawson Trail started to really deliver over the last 100km to Blinman. We were finally riding proper singletrack and having a good giggle as the back end of the bikes slipped out. A 15km descent was enough to put big smiles on our faces for the rest of the day, as we climbed long ridgelines and went up and over hundreds of rolling hills.

A photo posted by Ben (@autofotoben) on

As the sun disappeared behind the mountains, we were lucky enough to spend some time following families of emus and kangaroos – it was wildlife galore out there.

By the time we pulled onto the final stretch to Blinman Pub, we were able to stop and think about what had happened over the last week. With the exception of one day, we were on our Cannondale Slates from sunrise to sunset, completing possibly the best off-road bike route in Australia. We had conquered wind, hills and the worst kinds of mud.

In just a few hard days we’d learned more about each other than ever before. The Mawson Trail isn’t just a bike route – it’s an adventure ready to test you.

A photo posted by Ben (@autofotoben) on

Click HERE To Be Taken To The FULL Photo Gallery

The post Story Blog: A Bike Ride Along The 900km Offroad Mawson Trail in Australia appeared first on CyclingAbout.


The 2016 Touring Bicycle Buyer’s Guide is Now Available!!

$
0
0

After a few years of researching, testing, sketching and working out how to best present information about touring bikes – I’ve finally come up with what I think is the best way to understand bikes the way I do.

For the last six months I’ve worked tirelessly to write about, in simple terms – the most important characteristics of touring bikes. I’ve been in contact with dozens of manufacturers to obtain information that is not publically available. I’ve spent days calculating different measurements, gearing and steering speeds to allow people to make the most informed decisions possible.

Book Cover

The 2016 Touring Bicycle Buyer’s Guide features over 75 different touring bikes that you can compare in detail. It will be updated yearly at no charge, to reflect any changes in models, specifications, sizing and colours. In the future, you’ll find that more manufacturers will work with me to make this guide even more comprehensive!

Bicycle Touring Book Sample Page 10

There are some tools inside that I am extremely proud to have developed, including:
✓ How to buy and virtually compare touring bikes without ever test riding them (it can be hard to find touring bikes in shops – especially in your size)
✓ How to virtually size your touring bike from any other type of bike (road, mountain, cyclocross, hybrid)
✓ What the best touring bike is for different types of terrain (based on pannier weight, gear ratios, tyre widths and more)
✓ Bike Durability vs. Cost (finding the ‘sweet spot’ where you get maximum durability for your money)

Bicycle Touring Book Sample Page 74-75

Since the inception of CyclingAbout, I’ve noticed that manufacturers keep a watching eye on the site. Many things that I’ve been advocating to change, like frame geometry, specification and design – have been recently updated within the industry. It’s been such a great journey watching touring bikes evolve for the better.

When you support resources like The 2016 Touring Bicycle Buyer’s Guide, you allow me to continue providing awesome free content on CyclingAbout so that more people can travel by bike. How great is it that through the power of the internet, more people can see the world like we do!? If you have the time, I’d really appreciate any feedback you can provide to make this guide even better.

I can’t wait to see how this guide evolves over time, as I love finding out about so many different new bikes, innovative technologies and ways to travel by bike.

Head through to the Bicycle Touring Buyer’s Guide to get your copy.

Happy adventures,
Alee

The post The 2016 Touring Bicycle Buyer’s Guide is Now Available!! appeared first on CyclingAbout.

The 37 Best Roads In The World To Ride Your Bike

$
0
0

There’s something about mountain roads that really get me excited. The appeal must be the combination of the grand views plus the challenge of getting my bike to the top. For many of these roads, I’m still indecisive about whether I’d rather enjoy the view slowly on the way up, or fast on the way down. It’d be pretty exhilarating bombing down many of these roads!

Without further ado, here’s my list of the best roads in the world!

I didn’t want to just give you the name and a photo, so I’ve made sure to find out exactly where these roads all are on a map, so that you can find them and ride them!

Zigzag Road to Zukuk, India

There’s not many roads as crazy as the zigzag road to Zukuk. Tucked away between Nepal and Bhutan in the Himalayas, this road makes the most of the super steep mountainside to get you between small villages. This road is actually known as the ‘Old Silk Road’ as it was once a major trading route from China to India.

Best Road in the World

Zigzag Road to Zuluk, India

Tianmen Mountain Road, China

The Tianmen road is world-famous, taking you on a journey of 99 bends over 11km (6.8mi) to Tianmen cave, a natural hole in the mountain with a height of 131.5 metres (431 ft). Alternatively you can take the 7.5km (4.6mi) cable car trip to the top for the most stunning views.

Best Road in the World

The Tianman Mountain Road in China

24 Zig Zag Road, China

The 24 zig zag gravel road in China played an important role during WW2 to help the Chinese resist the Japanese invasion. Currently it is not well maintained, making it a perfect climb on your bike!

Best Road in the World

24 Zig Zag road in China.

Aizhai Winding Road, China

Gaining elevation on steep hillsides seems like a favourite pastime for the Chinese! The Aizhai winding road has stunning views the whole way up. These days the road is a bit less popular due to the construction of a gigantic bridge which connects both sides of the valley.

Best Road in the World

Aizhai winding road in China.

Jacob’s Ladder, Australia

Jacob’s Ladder in Tasmania goes right up to Ben Lomond Mountain. This dirt road climb is infamous in Australia – the towering dolerite cliffs dominating the landscape on either side.

Best Road in the World

Jacob’s Ladder, Australia. Image: NorthSouth.cc

Moldo Ashuu Pass, Kyrgyzstan

There are too many amazing roads in Kyrgyzstan to include in this page! But the Moldo Ashuu Pass is considered one of the most beautiful, with its constant views across the Naryn Valley as it winds its way up to Lake Song-Kul at 3200m (10498ft).

Image: aaa

The Moldo Ashuu Pass in Kyrgyzstan. Image: OffRoadKazan

Dizin Road, Iran

The Dizin Ski Resort is one of the biggest in Iran and has a great winding road to get you there. Given the high elevation of this road, it’s under snow for over six months per year!

Best Road in the World

The road to Dizin in Iran.

Lawdar Mountain Pass, Yemen

The Lawdar mountain pass is in the unsuspecting country of Yemen. This road features 34 switchbacks which take you up to 2267m (7437ft). Given the lack of vegetation, the views are spectacular!

Best Road in the World

Lawdar Pass in Yemen

Sani Pass, South Africa

The Sani Pass climbs to the border between Lesotho and South Africa. This dirt road hits a maximum of 2876m (9400ft) elevation, and is only allowed to be driven by 4×4 vehicles.

Best Road in the World

Sani Pass in South Africa. Image: Ayres Adventures

Serra da Leba, Angola

The Serra da Leba asphalt climb features seven tight switchbacks near the top of the pass (1845m/6053ft). It is one of the only areas of the region that can experience snow fall.

Best Road in the World

Serra Da Leba in Angola. Image: Rob Whittaker

Gorges du Dadès, Morocco

This famous picturesque road in Morocco is built into a unique rocky gorge landscape. It’s a popular destination for tourists to stop and enjoy the views.

Best Road in the World

Gorges du Dades, Morocco. Image: SeriousA

The Transfagarasan, Romania

The Transfagarasan high is 90km long and is one of the highest paved roads in Romania. It features dozens of stunning switchbacks and some unlit tunnels which are almost a kilometre long!

Best Road in the World

The Transfagarasan, Romania

The Transalpina, Romania

This winding road in Romania has just been resurfaced to be a modern highway which stretches 148km through the Carpathian Mountains. It was originally constructed in 200AD by the Roman legions, and was used to defeat the local forces.

Best Road in the World

The Transalpina, Romania. Image: Bereczki Barna

Leqet e Hotit, Albania

This climb winds through the rocky landscape of the Albanian mountains along the Montenegrin border. It has recently been sealed to make the view-friendly ride more pleasurable.

Best Road in the World

Leqet e Hotit, Albania. Image: Tonin Demaj

Grossglockner High Alpine Road, Austria

The Grossglockner Alpine Road is the highest sealed road in Austria, reaching a maximum of 2504 m (8215ft). It has been named after Austria’s tallest mountain.

Best Road in the World

Grossglockner High Alpine Road, Austria. Image: Imre Lakat

Forcella di Lavardet, Italy

These 14 sharp hairpin turns are some of the most famous in the world. As Forcella di Lavardet is an old military road, the gradient is as low as possible to get heavy machinery up and over the pass.

Best Road in the World

Forcella di Lavardet, Italy. Image: Alsardin

Passo San Boldo, Italy

Passo San Boldo is a unique climb because of the seven hairpin turns that have been tunnelled into the earth. Amazingly, this road was built in just 100 days by the Austro-Hungarian army during WW1. Due to time constraints, they ended up bringing in prisoners of war, the elderly and children to help out – 1400 workers ended up completing the project!

Best Road in the World

Passo San Boldo, Italy

Passo Dello Stelvio, Italy

The Stelvio would have to be one of the most photographed roads in the world. This mountain pass reaches a maximum elevation of 2757m (9045ft) after you’ve ascended all 48 hairpin bends.

Best Road in the World

Passo Dello Stelvio. Image: Mario.J

Old Gotthard Pass, Switzerland

The windy Gotthard Pass road was first constructed in 1830 to connect towns on either side of the mountain range. These days rail and road tunnels go right through the middle, but that doesn’t stop keen cyclists and drivers to enjoy the wild road up and down the mountain.

Best Road in the World

The old Gotthard Pass road in Switzerland.

Furka Pass, Switzerland

This Swiss mountain pass drops into the valley and back up the other side to a maximum elevation of 2429m (7969ft). Like other Swiss passes, there are now tunnels which go straight through the base of the mountains to make this road a great option for cyclists.

Best Road in the World

Furka Pass in Switzerland.

Col de Tende, France

This 7km long stretch of road features 48 switchbacks on the border between France and Italy. The first part of the pass is asphalted, but the second half of tight turns is all dirt. There are forts along the ridge line in both directions.

Col de Tende, France. Image: Giuntas

Col de Tende, France. Image: Giuntas

Col du Turini, France

The Col du Turini is famous as it employs walled switchbacks neatly stacked on top of one another to ease the gradient. The walls actually doubled as a medieval fortress back in the day!

Best Road in the World

Col du Turini, France

Col de Braus, France

This neat switchback climb in France reaches a maximum elevation of 1006m (3287ft) and is said to never be too steep.

Best Road in the World

Col de Braus, France

Colle Del Sommeiller, Italy

The Colle Del Sommeiller mountain pass is the highest valley pass in Italy at 2993m/9819ft, and if you descend the other side you’ll find yourself in France. This 26km climb will flick from sealed road to dirt, as you ride through the varied landscapes.

Colle Del Sommeiller, Italy. Image: Cycling Challange

Colle Del Sommeiller, Italy. Image: Cycling Challange

Lacets de Montvernier, France

This rather unbelievable road of 18 hairpin turns climbs up the valley over 3.4km (2.1mi). The tight twisty section of the climb averages a 180 degree turn every 120 metres (393ft)!

Best Road in the World

Lacets de Montvernier, France. Image: Steephill.tv / Sirotti

Sierra Nevada Road, Spain

The road up to Pico de Veleta (3392m/11128ft) from Sierra Nevada Ski Resort is a beauty! This winding dirt road navigates around the ski resort infrastructure and across the high alpine plains to provide an amazing view.

Best Road in the World

Sierra Nevada Road, Spain. Image: Piotr Zycki

Lysevegen Road, Norway

Lysevegen Road is a popular 29km (18mi) long stretch that was constructed in order to piece together the Tjodan hydroelectric power station. Prior to this 27 hairpin-road, the only access to the small town of Lysebotn was by boat!

Best Road in the World

Lysevegen Road, Norway

Trollstigen, Norway

In the height of summer, the Trollstigen in Norway can experience 2500 cars daily! It’s popular due to its steep gradients, 11 hairpin corners and unobscured views across the valley.

Best Road in the World

Trollstigen, Norway

Portachuelo de Llanganuco, Peru

This ultra-high Peruvian Pass (4767m/15639ft) is surrounded by snowy mountain peaks and crystal blue lakes in the lower sections. 28 hairpin turns allow you to gain 527m (1729ft) over 8.5km (5.3mi) to access the Huascaran National Park.

Best Road in the World

Portachuelo de Llanganuco, Peru

Road 663, Peru

Road 663 is a relatively unknown single-lane dirt climb that is particularly dangerous due to its lack of guardrails and sheer drops into the valley. You’ll be rewarded with excellent views over the valley if you choose to take it on!

Best Road in the World

Road 663 in Peru

The Road To Cotabambas, Peru

Straight up the side of a mountain, the gravel road (route 3SF) to Cotabambas climbs for 9.8km (6.1mi) and features 24 hairpin turns. You’ll gain almost 639m (2096ft) elevation to reach a maximum of 2900m (9514ft).

Best Road in the World

Road to Cotabambas, Peru

Collpani Pass, Bolivia

Near Collpani in Bolivia is a dirt road climb that features 52 hairpin turns over 10.4km (6.5mi)!

Best Road in the World

Collpani Pass, Bolivia

Paso de los Caracoles, Chile

This pass connecting Chile with Argentina (3200m/10500ft) is one of the more famous roads in the world. The name of this pass actually translates to ‘snail’s pass’, which give you an indication for how fast you’ll be moving when you attempt to ride up this!

Best Road in the World

Paso de los Caracoles, Chile. Image: Edison Zanatto

Cuesta del Diablo, Chile

On the 1240km long Carretera Austral highway you’ll find this 6km (3.7mi) twisty road dropping past the glacier and basalt walls of Cerro Castillo (2675m/8775ft).

Best Road in the World

Cuesta del Diablo, Chile

Serra Rio Do Rastro, Brazil

The Serra Rio Do Rastro is a lush Brazilian road that winds its way up to 1460m (4790ft) from sea level. Despite being 100km (62mi) from the ocean, from the top you can make out the water on a clear day.

Best Road in the World

Serra Rio Do Rastro, Brazil. Image: Mateus Pabst

Gangwon Do Road, South Korea

This serpentine road in South Korea winds its way up a steep valley. A viewing platform at the top allows you to look down over what you have accomplished.

Best Road in the World

Road in Gangwon Do Province, South Korea

Have You Ridden Any Roads That Should Make This List?

The post The 37 Best Roads In The World To Ride Your Bike appeared first on CyclingAbout.

This Chapman Cycles Tandem Is Everything This Framebuilder Ever Wanted

$
0
0

Rhode Island framebuilder Brian Chapman and his wife bought their first tandem about six years ago, and it worked out really well for them. That got Brian thinking – how could he improve the geometry, handling, load carrying, components and comfort? After a good five years of research and testing, he put together a tandem that was everything he could ever want.

Here’s What A Framebuilders Very Own Tandem Looks Like:

Chapman Cycles Tandem

This bike is all about small details.

This ‘constructeur’ tandem is littered with small details including internal dynamo light wiring, an integrated bell, a frame pump, polished parts, lugs, fillet brazing (inc. stems), hidden brake cables and even a Phil Wood drag brake. The styling of the bike is certainly on point – the Turf Green colour eloquently contrasting the polished silver parts, gumwall tyres and brown finishing kit.

Chapman Cycles Tandem

This tandem is heavily focussed around ‘constructeur’ bike styling.

The Phil Wood drag brake is a pretty handy addition to a tandem without disc brakes. This is an emergency third brake for steep or long descents where the cantilever brakes cannot provide enough power to slow the loaded tandem down. This is activated using a friction shifter mounted on the frame’s downtube.

The matching single wheel trailer mounts at the rear axle – you can see the clips which ensure that the trailer cannot slip off its mount.

Chapman Cycles Tandem

The Phil Wood drag brake.

There’s an eccentric bottom bracket at the front of the tandem to tension the timing chain on the left hand side. This bottom bracket section of the frame is a great place to see how meticulously the fillet brazing has been done. Smooth as a baby’s bottom!

Chapman Cycles Tandem

The fillet brazing around the eccentric bottom bracket is exceptional.

The trailer is designed to be an alternative to rear panniers. This keeps weight off the rear wheel and allows for a greater carrying capacity than if it just had rear panniers. The trailer even has its own dynamo light which can be connected up from a cable in the tandem’s left chainstay.

Chapman Cycles Tandem

The trailer is such a great match to this classic tandem.

The final product is absolutely stunning – the matching trailer is such a gorgeous addition. You can see more of Brian’s custom bikes on his website, Facebook page, Flickr or Instagram profile.

Chapman Cycles Tandem

The complete tandem with trailer is spectacular!

There’s More Beautiful Custom Touring Builds To See HERE.

The post This Chapman Cycles Tandem Is Everything This Framebuilder Ever Wanted appeared first on CyclingAbout.

The New 2017 Specialized Sequoia Light Touring Bike

$
0
0

Specialized have just announced a new model to slot into their Adventure range. Called the Sequoia, it’s designed to fit perfectly between the more road-going Diverge and their all-out touring bike the AWOL.

The Sequoia model has been in and out of the Specialized range since the early-1980s. In those days it was effectively Specialized’s touring bike as it had rack/fender mounts and additional clearance for wider tyres. Or Specialized’s road bike built for dirt roads if you like.

Three decades on and the Sequoia still has roots to the original design. It is constructed using steel, and will fit front and rear racks, as well as fenders and wider tyres than both a regular road or cyclocross bike.

The carbon fork is one of the highlights of the Sequoia. With a tapered steerer, internal cable routing, internal light routing, rack and fender mounts, a thru-axle and ‘flat mount’ disc brake tabs – it looks great and is really functional too. It can fit up to a 50mm wide tyre! The tyre that you see fitted to this bike is the new Specialized Sawtooth 42c, designed to be a fast rolling gravel tyre.

This steel frame has eyelets everywhere. Enough for a rear rack, fenders and a third bidon cage. The brake and gear cables are managed really neatly under the downtube, and if you want to use Di2 gearing, this frame is ready. Surprisingly, this bike uses a threaded bottom bracket shell (praise the lord!).

The Expert model comes with a 1X drivetrain. This simplifies things a bit, but won’t have the same range as the lower models which employ front derailleurs.

The flat mount brakes are super neat – we will soon see this style of caliper on all disc road bikes. Designed to mount on the chainstay, they are also great for rack mounting.

Specialized have introduced a new handlebar with this bike. This dirt drop ‘alt’ handlebar (HERE is a list of more!) offers more flair than a regular road handlebar for offroad riding and a little bit more rise to keep you comfortable.

The bartape and saddle are covered in a nice denim style material to give the bike a unique look. The Expert model comes with the CG-R carbon seatpost which offers over 20mm of vertical flex to smoothen out the bumps in the road.

Specialized also created the Cruzero rim with this bike. Being wider than a regular road rim (25mm internal), it gives 40-50mm tyres a more suitable profile. It’s also tubeless ready. The Cruzero wheelset makes life simple by offering the same length spokes on both the drive and non-drive sides, for both the front and rear wheels. Also, if you want to go wider on the tyres again, the Sequoia frame is compatible with 650B (27.5″) wheelsets including 650×47 tyres.

The Sequoia will be available in three different models and six different sizes. Each frame size uses a different blend of tubing to achieve the same ride feel. All three bikes will be steel, but only the top two will come with the carbon fork. The top-model (the Expert pictured) is a 1x drivetrain while the others are 2x. Otherwise the parts will vary in quality and function based on the price of each bike. It’s likely that an Expert-level frameset will be available for US $1200 too. More on pricing below.

Specialized Sequoia Expert 2017

The complete Specialized Sequoia is a neat looking travel bike. Image: TheRadavist.com

Head over to TheRadavist for more images of this bike!

How Is The Sequoia Different To The Other Specialized Adventure Models?

Sequoia vs. Diverge
– The maximum tyre width is 10mm wider on the Sequoia (35 vs. 45C)
– The Diverge is shorter in frame reach by ~10mm, but similar in frame stack
– The Diverge has steering that is quicker and more nimble like a road bike
– The Diverge is 10-15mm shorter than the Sequoia in the chainstay
– The Diverge comes in aluminium or carbon, while the Sequoia comes in steel

Sequoia vs. AWOL
– The maximum tyre width is 5mm narrower on the Sequoia (50 vs. 45C)
– The AWOL is similar in frame reach, but taller in frame stack by ~30mm
– The AWOL has steering that is slower but more stable like a mountain bike
– The AWOL is 25mm longer than the Sequoia in the chainstay
– The AWOL comes with a steel fork, while the Sequoia comes with a carbon fork in the top-two models

What Kind Of Riding Is The Sequoia Best Designed For?

This is a light touring bike, so ideally you’ll have less than 15kg of gear on board. Although it is rack compatible, it’s a pretty suitable candidate for bikepacking adventures given the generally lightweight specification. The smallest gear will be 25 gear inches (2x) and 28 gear inches (1x) – on par with other ‘light touring’ bikes. These gears may sometimes not be low enough for those big mountain passes, steep hills or heavier loads. HERE is some more information on touring bike gearing to give you more perspective.

Specialized Sequoia Expert 2017

The Specialized Sequoia would make a great bikepacking bike with a mix of gravel and paved road. Image: BikeRadar.com

Pricing

The Sequoia range will be available in September 2016 and the pricing is as follows:

Specialized Sequoia Expert

Specialized Sequoia Expert 2017 – US $3500 / £2500

Specialized Sequoia Elite 2017

Specialized Sequoia Elite 2017 – US $2500 / £1500

Specialized Sequoia 2017

Specialized Sequoia – US $1300 / £950

Want To Compare These Touring Bikes With Dozens of Others?

Check out The Touring Bicycle Buyer’s Guide which compares touring bike steering, sizing, gear ratios, specification, pricing and more. This guide is updated annually with the latest models at no extra cost!

Bicycle Touring Book Sample Page 74-75

The Touring Bicycle Buyer’s Guide helps you compare touring bikes, side-by-side.

Helpful Resources

All About Touring Bike Brakes
Frame Materials for Bicycle Touring
How to Select Touring Bike Gearing
Understand Bicycle Frame Geometry
What’s the Difference between Cyclocross and Touring Bikes?

2016 Touring Bikes Overview

Advocate Lorax
Basso Ulisse
Bianchi Volpe and Lupo
Bombtrack Beyond
Brodie Elan Vital
Cannondale T-Series
Cinelli Hobootleg Geo
Fuji Touring
Genesis Tour de Fer
Giant ToughRoad
Jamis Aurora and Aurora Elite
Kona Big Rove
Kona Roadhouse and Sutra LTD
Kona Sutra
Marin Four Corners
Masi Giramondo
Niner RLT9
Rawland Ulv and Ravn
Salsa Deadwood
Salsa Marrakesh
Specialized AWOL
Traitor Wander
Trek 920, 720, 520 & CrossRip

The post The New 2017 Specialized Sequoia Light Touring Bike appeared first on CyclingAbout.

Bikepacking Goes More Mainstream: The New Specialized Burra Burra Bikepacking Bags

$
0
0

As bikepacking goes more mainstream, Specialized has entered this once hand-tailored domain with their new Specialized Burra Burra bikepacking bag line. Like Ortlieb’s new gear, the Burra Burra bikepacking bags are waterproof, seam-sealed and employ weather-resistant zips. Unlike many brands (with the exception of Porcelain Rocket) the Specialized saddlebag comes with a unique stabilising bracket that mounts to the seatpost, and a handlebar bracket which holds the handlebar harness firmly in place.

The name ‘Burra Burra’ is derived from a trail located in Henry Coe State Park in California USA. Although origin of the trail name is a mystery, what we do know is that this is a steep offroad trail – the kind of place you don’t take panniers.

These bags will be available late-August.

Let’s take a closer look at Specialized’s new bikepacking bags!

Specialized Burra Burra Saddle Bag

The waterproof saddle bag will come in two different sizes (8 or 10.5L) depending on your needs. Both bags employ the seatpost mount (27.2 or 30.9mm) – essentially just a clamp with two protruding arms to stop the bag rocking back and forth. The rolltop closure allows you to modify the bag’s size based on the gear you’re carrying. They come in at US $130 for the 8 litre and US $140 for the 10.5 litre.

Specialized Burra Burra

The Specialized Burra Burra Saddlebag offers minirack stabilisation.

Specialized Burra Burra Handlebar Harness and Drybag

The handlebar harness comes with a handlebar mount to keep your front load in check. Designed to fit both flat and road handlebars with a 31.8mm diameter, the harness will space your luggage away from your handlebar, perfectly accomodating the 13 and 23 litre drybags. These specifically-designed drybags feature roll-top enclosures on both ends, and have a zip on the top for quick access to small items. The harness retails at US $90 and the 13L and 23L drybags at US $40 and $45 respectively.

Specialized Burra Burra

The Specialized Burra Burra Handlebar Harness has a built-in mount to keep it stable.

Specialized Burra Burra Framebag

Specialized have introduced size-specific partial bikepacking framebags for their bikes so that you can carry a few things while still fitting in a bidon or two. The 3, 5 and 8 litre bags will retail for US $90, $100 and $110 respectively.

Specialized Burra Burra

The Specialized Burra Burra framebag comes in three different sizes depending on your frame.

Specialized Burra Burra Top Tube Bag

The Burra Burra top tube bag is not particularly special, but will match the styling of the other bags in this range. Its 0.75 litre capacity is good or carrying snacks, money, a phone or a small camera. You can get this for US $50.

Specialized Bikepacking

The Specialized Burra Burra Top Tube Bag will give you handy access to snacks, money or a camera.

Specialized Burra Burra Cagepack and Cagerack

The Cagerack is like many of the other fork mount cargo cages with its double strap design. Specialized designed a 1 litre Cagepack to slot in nicely (US $40), but you’ll be able to fasten all kinds of cylindrical objects in the Cagerack (US $30).

Specialized Bikepacking

The Specialized Burra Burra Cagerack will mount to the side of your fork and adjust to fit cylindrical objects.

Specialized Burra Burra Pizza Bag

This padded 10 litre bag sits on Specialized’s own Pizza Rack. The roll-top design allows you to easily stow lots of gear right while you’re still straddling your bike. On this bag you’ll find zippered side compartments for keys, money or SD cards. The Pizza bag is sold in conjunction with the Pizza front rack for US $100.

Specialized Bikepacking

The Specialized Burra Burra Pizza Bag is a good alternative to the handlebar harness if you use a front rack.

Head HERE For A Complete List of Bikepacking Bag Manufacturers!

The post Bikepacking Goes More Mainstream: The New Specialized Burra Burra Bikepacking Bags appeared first on CyclingAbout.

Viewing all 455 articles
Browse latest View live